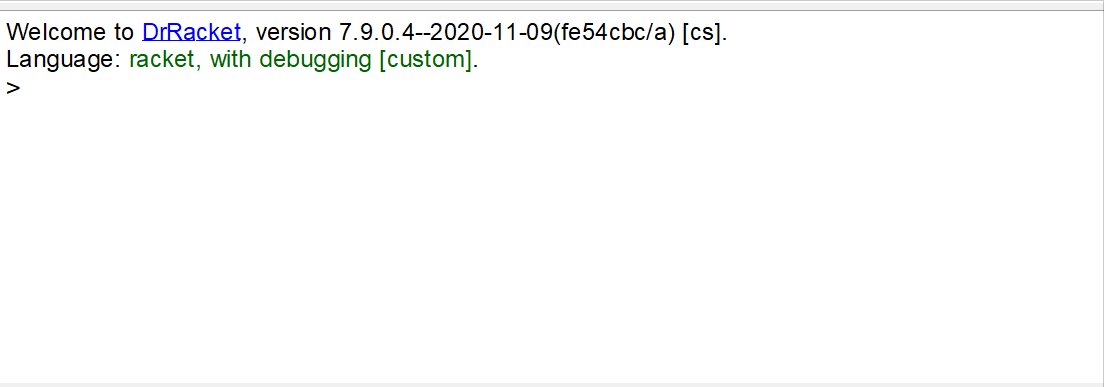
Space Invaders
… in which we attempt to recreate a classic game using the Racket graphical facilities and exploring classes and objects.
Space Invaders is a fairly popular game, with many implementations. Here we will implement a simple version with space ships moving and descending and a cannon shooting them. The game could be extended with other features, but this is already a very long blog post… By the way, if you are in a hurry, you can go directly to the the source code for the game.
Meet the Aliens

the aliens
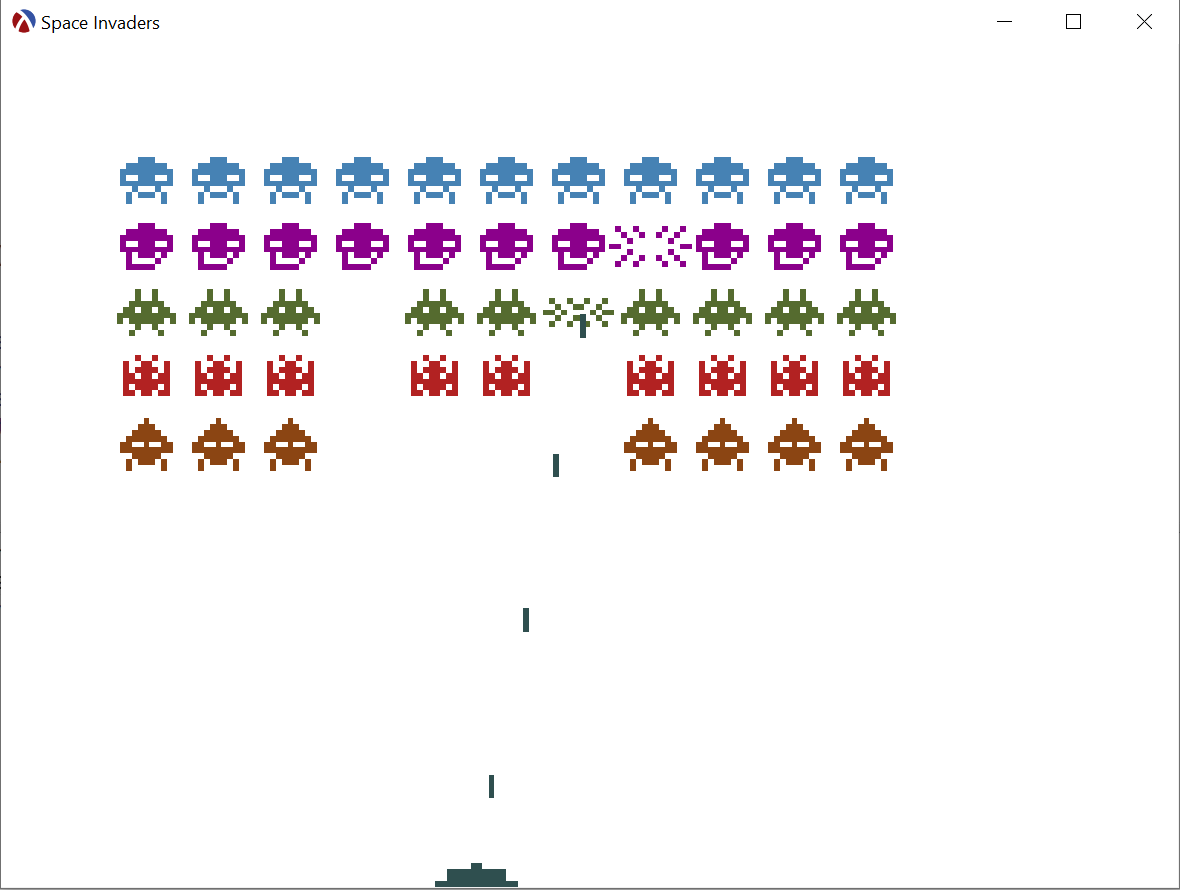
We cannot have a Space Invader game without invaders, so let’s design these first. Usually, the graphics resources for games are created using specialized programs, but for a simple game like Space Invaders, we can just write the models as strings and write a some Racket functions to convert them into pictures. This is the same technique used in the A Game Of Tetris blog post. For example, here is the definition for the first alien, which we’ll call Zabrak:
1 2 3 4 5 6 7 8 9 |
(define zabrak-frame-a '(" ZZZ " " ZZZZZZZ " "ZZZZZZZZZ" "Z ZZZ Z" "ZZZZZZZZZ" " Z Z " " Z ZZZ Z " "Z Z")) |
We can convert the above list of strings into a picture is just a few lines of code: each “Z” character is converted into a square, while the space characters are left empty. row->squares will convert a single string into a picture and block->pict combines the resulting pictures into a single block and applies the color to the blocks:
1 2 3 4 5 6 7 8 9 10 11 12 13 14 |
(require pict racket/draw racket/gui) (define (block->pict block #:color (color "steelblue")) (colorize (apply vc-append (map row->squares block)) color)) (define square-size 5) (define (row->squares row) (define items (for/list ([char (in-string row)]) (if (equal? char #\Z) (filled-rectangle square-size square-size) (ghost (rectangle square-size square-size))))) (apply hc-append items)) |
The end result can be displayed directly into the DrRacket REPL, allowing us to quickly get an idea of how the image will look like and make any necessary tweaks. We can design the look of our game graphics before we even get to write any of the actual game code:
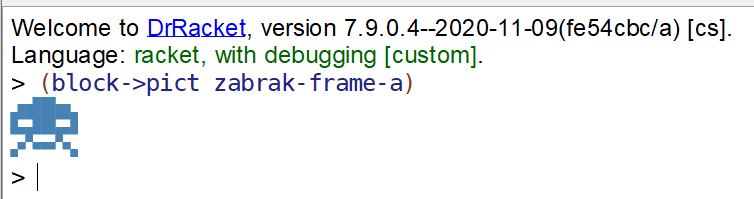
The aliens in the game will be animated, having their antennas and legs move. This can be achieved by defining separate frames for each animation step:
1 2 3 4 5 6 7 8 9 |
(define zabrak-frame-a (define zabrak-frame-b (define zabrak-frame-c '(" ZZZ " '(" ZZZ " '(" ZZZ " " ZZZZZZZ " " ZZZZZZZ " " ZZZZZZZ " "ZZZZZZZZZ" "ZZZZZZZZZ" "ZZZZZZZZZ" "Z ZZZ Z" "Z ZZZ Z" "Z ZZZ Z" "ZZZZZZZZZ" "ZZZZZZZZZ" "ZZZZZZZZZ" " Z Z " " Z Z " " Z Z " " Z ZZZ Z " " Z ZZZ Z " " Z ZZZ Z " "Z Z")) " Z Z ")) " Z Z ")) |
We can visualize all the frames by applying block->pict on each of them, although it is difficult to see that the common parts overlap correctly and only the intended parts move:
Animations in the REPL
While the DrRacket REPL can display pictures directly, it cannot display animations. However, we can extend the REPL to support this: The REPL recognizes special objects, called “snips” which are objects that can display anything in the REPL. Snips can be used for a lot of cool things, such as using them directly in games, such as Ishido and Chess Game Interface, but also at providing complex visualizations in the REPL, for example an interactive map. Here we’ll write a simple snip to animate some pictures.
The animation-snip-class is an object which is used to deserialize snips — we don’t use this feature directly, but the Racket GUI system requires one such object to be defined for every type of snip class. The code is mostly boilerplate, but one such object needs to be defined for every type of snip used by the application, and each such object needs to have a different class name set using set-classname:
The animation-snip% class is the actual snip and derives from the snip% class from the Racket GUI libraries. When constructed, it receives a list of pictures, picts, which are the individual frames of the animation, as well as an interval, in milliseconds, which defines the time between changing pictures. It has the following member variables and methods:
-
The
widthandheightmembers of the snip define the width and height of the entire snip, being the maximum of all the pictures — this allows using different sized pictures for the animation. -
indexrepresents the current picture being displayed — a snip cannot simply draw when it wants to, instead the system will invoke itsdrawmethod at unspecified intervals, so it must be ready to draw its current state at any time. -
the
on-refreshmethod is invoked periodically from a timer (seetimer%creation below), and will increment the frame and tell the snip administrator that this snip needs to be redrawn — this is how a snip can inform the system that it has changed. -
the
copymethod creates a copy of the snip, this is required for snips which are used directly in the DrRacket REPL, in this case, the implementation is simple: it creates and returns new animation snip with the same pictures and refresh interval. -
the
get-extentmethod is invoked by the system to determine the size of the snip — it is used to know how much space to reserve for it, so it lines up nicely with other things in the REPL. -
the
drawmethod is invoked by the system to actually draw the snip. While the snip can draw anywhere it wants, it should usually draw at the passedx,ycoordinates, and not extend past the width and height it has supplied toget-extent. In the animation snip case, the draw method usesdraw-pict(provided by thepictlibrary), to draw the current picture.
1 2 3 4 5 6 7 8 9 10 11 12 13 14 15 16 17 18 19 20 21 22 23 24 25 26 27 28 29 30 31 32 33 34 35 |
(define animation-snip% (class snip% (init-field picts [interval 500]) (super-new) (send this set-snipclass animation-snip-class) (define width (apply max (map pict-width picts))) (define height (apply max (map pict-height picts))) (define index 0) (define (on-refresh) (set! index (modulo (add1 index) (length picts))) (define admin (send this get-admin)) (when admin (send admin needs-update this 0 0 width height))) (define timer (new timer% [interval interval] [notify-callback on-refresh])) (define/override (copy) (new animation-snip% [picts picts] [interval interval])) (define/override (get-extent dc x y w h descent space lspace rspace) (when w (set-box! w width)) (when h (set-box! h height)) (when descent (set-box! descent 0.0)) (when space (set-box! space 0.0)) (when lspace (set-box! lspace 0.0)) (when rspace (set-box! rspace 0.0))) (define/override (draw dc x y . other) (define pict (list-ref picts index)) (define ox (* (- width (pict-width pict)) 0.5)) (define oy (* (- height (pict-height pict)) 0.5)) (draw-pict pict dc (+ x ox) (+ y oy))) )) |
The animation-snip% can be used directly, but object creation can be verbose, so we can define a more convenient animate function which creates this snip:
To visualize the actual animation, we can simply call animate with the list of the pictures provided by block->pict. Even though only three frames have been defined for this alien, the actual animation needs to go though the steps A, B, C, B before it cycles back to the first frame. This is something that is not easy to pick up if the animation frames are listed side-by-side, but it is immediately obvious once the animation is played.

The animation-snip% itself will not be used in the game, but it is a useful tool in designing the game animations themselves. With the animation-snip% done, the rest of the aliens can be designed:
1 2 3 4 5 6 |
(define zabrak-color "Steel Blue") (define zabrak-pict-a (block->pict zabrak-frame-a #:color zabrak-color)) (define zabrak-pict-b (block->pict zabrak-frame-b #:color zabrak-color)) (define zabrak-pict-c (block->pict zabrak-frame-c #:color zabrak-color)) (define zabrak-animation (list zabrak-pict-a zabrak-pict-b zabrak-pict-c zabrak-pict-b)) |
You can design your own aliens: pictures for alien models can be easily found with an Internet search, and if you are unsure how to name the aliens, Wikipedia has a page listing alien species names. Finally, if you want to just have a look a the ones I defined, they are available in the game source.
Prepare the Arena
The Space Invaders game involves several “actors”: the alien ships moving across the screen, the canon moving left and right in response to user input and shooting lasers and the lasers hitting space ships. These actors need to be able to draw the object in the game window, respond to keyboard input and interact witch each other (for example, when a laser shot hits a space ship). The actors will also need a common “clock”, which measures the passage of time — this will be used both to drive animations and move objects across the screen.
We will need to write some code to manage the shared access to these resources and provide a common interface for the actors. This code is relatively generic: it does not know anything about the game or the game rules itself and could be reused to implement other games. For more serious games, this would be called a “game engine” but our code is too simple to deserve that name, so we will not use it here, instead we will call it an “arena”.
The Scene
All the game actors can be kept in a global list named scene, with the add-actor and remove-actor functions added as a convenience. Actors such as space ships will be added at the start of the game, but other actors, like laser shots will be added during the game. Finally, actors can also be removed during the game, for example a space ship which was hit by a laser shot.
The GUI
The game itself will be displayed in a window, which, in Racket GUI is a frame%. Frame objects also receive keyboard events and by overriding the on-subwindow-char method we can intercept these and send them to all the actors in the scene. The frame will also be notified when the window is closed, via the on-close method and we use this opportunity to set the game-outcome to 'abandoned. The game loop described below will monitor this variable to know when to exit the game.
1 2 3 4 5 6 7 8 9 10 11 |
(define game-outcome 'undecided) (define the-frame (new (class frame% (super-new [label "Space Invaders"] [width 1024] [height 768]) (define/augride (on-close) (set! game-outcome 'abandoned)) (define/override (on-subwindow-char receiver event) (for ([o (in-list scene)]) (send o keyboard-event event)) (super on-subwindow-char receiver event))))) |
A somewhat unusual technique is used to create the-frame% in the code above: we create a class derived from frame% using class, than immediately instantiate that derived class and assign the resulting object to the-frame. In other languages, this is a two step process, but in Racket, they can be combined:
Drawing for the game will happen in a canvas% instance, but we also need to derive from the canvas% class and override the on-size method, so we are informed when the size of the canvas changes, for example when the window is resized. We could also override on-paint for painting onto the canvas, but instead we use the paint-callback init member to provide the paint function.
1 2 3 4 5 6 7 8 9 |
(define the-canvas (new (class canvas% (super-new [parent the-frame] [paint-callback on-canvas-paint]) (define/override (on-size _width _height) ;; _width and _height are for the entire widget area ;; determine drawing area instead. (define-values (w h) (send this get-client-size)) (for ([o (in-list scene)]) (send o canvas-size-changed w h)))))) |
The on-canvas-paint callback simply forwards the paint request to every actor in the scene:
The Game Loop
We have the mechanisms to draw actors onto the canvas and receive keyboard events from the system, what is left is to update the actors as time passes. Technically, each actor could start its own thread to update itself, but in a game, we want movements to be synchronized perfectly: all actors should see the exact same timestamps. This means that the game time needs to be explicitly measured in one place and this time communicated to all actors. The game loop is where all this happens.
The game loop starts with a small initialization sequence: sets the game outcome to 'undecided and shows the game window, giving it the keyboard focus. Next it determines the current time, by calling current-inexact-milliseconds. The game time will be measured from this moment in time.
Games also have a “frame rate”, which is the number of updates done in a second. Typically, this value is the same as the monitor refresh rate ensuring that the game will be updated once for each display refresh. How to set the frame rate and sync the game loop with monitor refreshes is a complex topic, here we’ll just set the frame rate to 60 as this is a good approximation of what most monitors use. If your computer is slow, you may also want to set the frame rate to a lower value, for example 30.
Frame rate cannot be used directly in the game loop, instead we need to calculate the frame-time, which is the amount of time each “update slice” should take. This value is simply the inverse of the frame rate. We multiply it by 1000.0 to convert the value to milliseconds.
The game loop itself performs the following steps:
- It determines the
game-timewhich is the difference between the current time and the start time. - For each actor in the scene, it calls their
updatemethod with the current game time. The actors are responsible for updating their internal state. - It sends a
refreshrequest to the canvas. In response to this request, the canvas will, at some later time and in a separate thread, call the paint callback invoking each actorspaintmethod. - it determines the time it took to perform all the previous steps, this is the
update-duration - If the update duration is less than the frame time, it sleeps for the residual time.
- the game loop exists when it detects that the
game-outcomeis'abandoned— this value is set when the user closes the window.
By sleeping the residual time, the game loop ensures that it does not update objects faster than necessary, since updates can only be seen when the monitor is refreshed. Also, by measuring the actual time and passing it to the actors, the game movements will be less affected by variations in execution time: each loop, the objects will update based on the duration of that loop, not by a fixed amount:
1 2 3 4 5 6 7 8 9 10 11 12 13 14 15 16 17 18 19 |
(define (run-game-loop #:frame-rate [frame-rate 60]) (set! game-outcome 'undecided) (send the-frame show #t) (send the-frame focus) (define start-timestamp (current-inexact-milliseconds)) (define frame-time (* (/ 1.0 frame-rate) 1000.0)) (let loop () (define now (current-inexact-milliseconds)) (define game-time (- now start-timestamp)) (for ([o (in-list scene)]) (send o update game-time)) (send the-canvas refresh) (define update-duration (- (current-inexact-milliseconds) now)) (define remaining-time (- frame-time update-duration)) (sleep/yield (/ (max 0 remaining-time) 1000.0)) (unless (equal? game-outcome 'abandoned) (loop)))) |
That is all that is required for managing actors in the game. The code above will distribute time updates and key presses to actors and arrange for their drawing on the canvas, but other that that, has no concept of a “Space Invader” game and could be reused for other games as well.
The Actors
Running the game loop itself will produce an empty canvas, because we have no actors yet, so we’ll work on that task next. Before we do that, we need to clarify what exactly is an actor.
The arena will manage actors which are the entities that make up a particular game. The arena expects each actor to be an object, since it uses the send function to send messages to it, and to implement the keyboard-event, canvas-size-changed, paint and update messages or methods. We can codify this information with an interface, and we can also add contracts to each method, thus ensuring not only that an actor implements a method, but it also accepts the correct number and types of arguments. Racket uses the prefix <%> for interfaces, but there is nothing special about the name actor<%>, we could have easily called it actor-interface.
Having just an interface will force all actors to implement these methods whether they need them or not. For the “Space Invaders” game, we know that only the cannon will need keyboard events, and rest of our actors will just have an empty keyboard-event method. It is simpler to provide an actor base class which provides default implementations of these methods, so actual actors implement only what they need.
What should we put in a common actor class? We could simply provide default implementations for all the methods in the actor interface, but we can do a bit more than that.
The paint method for most actors will display a bitmap at some coordinates, so we can provide a bitmap, x and y fields so derived classes can only set those, and the paint method will display the bitmap. For most actors this means that they won’t need to implement a paint method at all.
The update method receives the “game time” as an argument, this is an increasing time with a reference to an unspecified start time (the start time is available in the game loop, but not accessible to actors). However, there are two types of updates that we need to perform:
-
for actors which move, they need the time since the last call to update, to calculate the movement amount since they were last updated.
-
for actors which are animated, they need the time from when they were created
We can write an update method which tracks both types of times, and call update/delta-time and update/life-time methods which derived objects can override to receive the either the delta time or the life time.
The actor% class below implements all this functionality:
1 2 3 4 5 6 7 8 9 10 11 12 13 14 15 16 17 18 19 20 21 22 23 24 25 26 27 |
(define actor% (class* object% (actor<%>) (init-field [bitmap #f] [x 0] [y 0]) (field [creation-time #f] [last-time #f]) (super-new) (define/public (paint canvas dc) (when bitmap (define width (send bitmap get-width)) (define height (send bitmap get-height)) (define top-left-x (- x (/ width 2))) (define top-left-y (- y (/ height 2))) (send dc draw-bitmap bitmap top-left-x top-left-y))) (define/public (update game-time) (if creation-time (update/life-time (- game-time creation-time)) (set! creation-time game-time)) (when last-time (update/delta-time (- game-time last-time))) (set! last-time game-time)) (define/public (keyboard-event e) (void)) (define/public (canvas-size-changed w h) (void)) (define/public (update/life-time lifetime) (void)) (define/public (update/delta-time dt) (void)) )) |
Set up the Defenses
Preparing the arena involved writing a lot of code without seeing any results, so let’s implement the first actor: the cannon. This is an object which moves at the bottom of the screen based on user input.
The Cannon
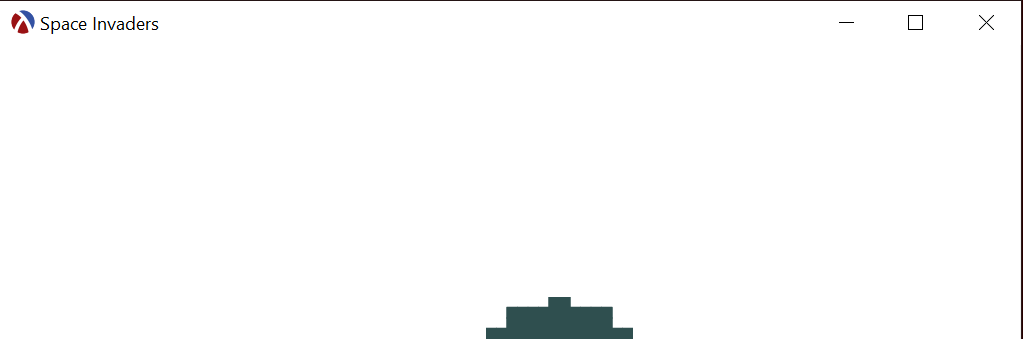
Just as with the aliens, we need to define the cannon picture itself, but, since there will be no animation for the canon, we only need to define one frame:
The cannon will need to check keyboard events for the left and right keys and move the picture in response to these events, taking special care not to move it past the left and right limits of the actual window.
- the cannon has a
speedfield, which can be specified at object creation time (because it is an init-field). This determines how fast the canon moves. The speed is in drawing units / millisecond. - it initializes the
bitmapfield in the parent class to the cannon bitmap by usingpict->bitmapto convert a picture to a bitmap. Once set, this bitmap will never change for the lifetime of the object - the class has a few internal fields of its own:
directionis the movement direction, which can be left, right or none if the cannon does not move;left-limitandright-limitare the extents of the left and right movement.
The class also implements the keyboard-event, canvas-size-changed and update/delta-time methods:
1 2 3 4 5 6 7 8 9 10 11 12 13 14 15 16 17 18 19 20 |
(define cannon% (class actor% (init-field [speed 0.1]) (super-new [bitmap (pict->bitmap cannon-pict)]) (define direction 0) ; -1 -- left, 0 -- none, 1 -- right (define-values (left-limit right-limit) (values 0 100)) (define/override (keyboard-event event) ;; ... ) (define/override (canvas-size-changed new-width new-height) ;; ... ) (define/override (update/delta-time dt) ;; ... ) )) |
Keyboard event handling for the cannon means that we look for the left and right key presses and set the movement direction accordingly. The GUI event system sends keyboard events for both key presses and releases, and we need to handle both. Why not just update the position of the canon instead of recording the movement direction? The problem is that keyboard press events are sent periodically and the repeat rate of the keyboard, which is different than the update rate of the game — incrementing the position on key press events would make the cannon jump from position to position.
1 2 3 4 5 6 7 8 9 10 11 12 |
(define cannon% (class actor% ;; Other cannon% members are also available (define/override (keyboard-event event) (case (send event get-key-code) ((release) (when (member (send event get-key-release-code) '(left right)) (set! direction 0))) ((left) (set! direction -1)) ((right) (set! direction 1)))) )) |
The cannon is also interested in canvas size changes, since it needs to update the left and right limits of movement as the window size changes. The canvas-size-changed method receives the new canvas size, and the method also needs access to the bitmap itself, thus the inherit field declaration. It will also update the y field so the cannon is always placed at the bottom and the x field to make sure that it is still inside the window.
1 2 3 4 5 6 7 8 9 10 11 12 13 14 |
(define cannon% (class actor% ;; Other cannon% members are also available (inherit-field bitmap x y) (define/override (canvas-size-changed new-width new-height) (define width (send bitmap get-width)) (define height (send bitmap get-height)) (set! left-limit (/ width 2)) (set! right-limit (- new-width (/ width 2))) (set! y (- new-height (/ height 2))) (set! x (max left-limit (min right-limit x)))) )) |
Finally, the cannon will need to update its position, and to do that we’ll use the update/delta-time method since it only needs to adjust the position based on the time passed since the last call to update. The method computes the distance moved as the speed multiplied by time and adjust the X position of the parent actor% accordingly, making sure that the position is still inside the playing field:
1 2 3 4 5 6 7 8 9 10 |
(define cannon% (class actor% ;; Other cannon% members are also available (inherit-field x) (define/override (update/delta-time dt) (define distance (* direction speed dt)) (set! x (max left-limit (min right-limit (+ x distance))))) )) |
To see it in action, we need to create a cannon, add it as an actor to the arena and run the game loop:
1 2 |
(add-actor (new cannon%)) (run-game-loop) |

Firing Laser Shots
The cannon can fire laser shots upwards and these can also be modeled as actors. First, here is the picture for a laser shot, a simple vertical beam:
The laser shot moves at a constant speed upwards, but it ignores key presses or window size changes. It is initialized with the correct bitmap and only has a update/delta-time method which updates its y (vertical position) bases on the time that passed. When the vertical position is less than 0, which means the object is now outside the window, the laser shot simply removes itself from the scene using remove-actor:
1 2 3 4 5 6 7 8 9 10 11 12 13 |
(define laser-shot% (class actor% (init-field [speed 0.5]) (super-new [bitmap (pict->bitmap laser-shot-pict)]) (inherit-field y) (define/override (update/delta-time dt) (define distance (* speed dt)) (set! y (- y distance)) (when (< y 0) ;; The laser shot has left the arena (remove-actor this))) )) |
Laser shots are created by the cannon object when the user presses the keyboard. It is tempting to create these actors in the keyboard-event method, but it looks nicer if they are actually created in the update method, since than the initial position of the laser shot will be in sync with the position of the cannon. Here are the updated keyboard-event and update/delta-time methods: when the space key is pressed, the shoot? variable is set to true and the update method will create a new laser-shot% object and add it as an actor to the arena. Other than creating these objects, the cannon does not manage them in any way: the laser shots know how to move upwards and when to “expire”:
1 2 3 4 5 6 7 8 9 10 11 12 13 14 15 16 17 18 19 20 21 22 23 24 25 |
(define cannon% (class actor% ;; Rest of the cannon class definition is unchanged... (define shoot? #f) ;; Updated to handle the "space" key (define/override (keyboard-event event) (case (send event get-key-code) ((release) (when (member (send event get-key-release-code) '(left right)) (set! direction 0))) ((left) (set! direction -1)) ((right) (set! direction 1)) ((#\space) (set! shoot? #t)))) ;; Updated to create laser-shot% objects (define/override (update/delta-time dt) (define distance (* direction speed dt)) (set! x (max left-limit (min right-limit (+ x distance)))) (when shoot? (set! shoot? #f) ; reset it (define height (send bitmap get-height)) (add-actor (new laser-shot% [x x] [y (- y height)])))) )) |
And this is all that is required for the cannon to have shooting capabilities:
Assemble the Fleet
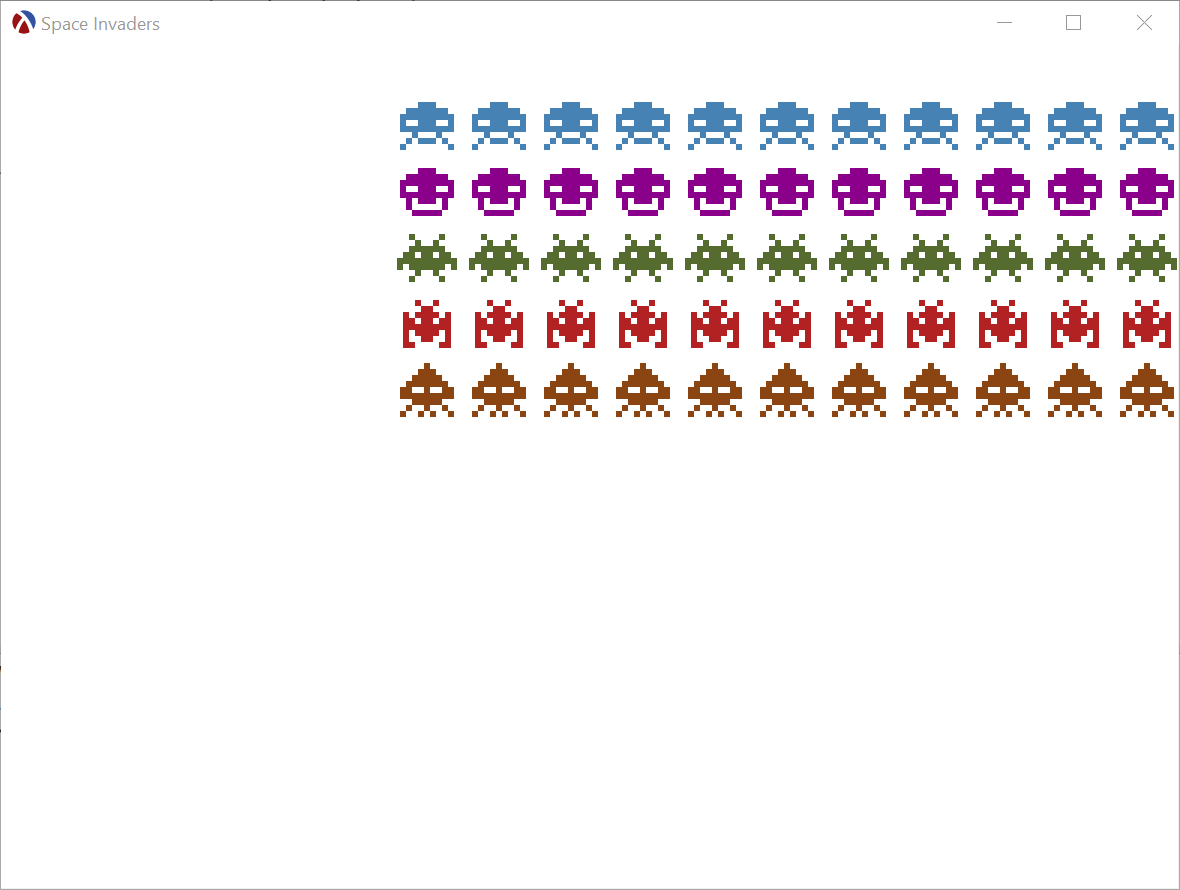
With the defenses prepared, we need to have something to shoot at. The invaders fleet is composed of five rows containing 11 space ships each. We already have the pictures for the animations of the alien ships, we now need to create the actors which represent these in the scene.
There is an interesting design decision before us about what we will represent as an actor in our game: the individual space ship or the fleet? Each individual space ship has its own animation and will need to check for collisions with the laser and explode, however all space ships move as part of a fleet — for example all space ships will need to change direction when the left-most or right-most ships reached the edge of the screen, regardless of where the other ships are.

We can actually implement both the space ships and the fleet as actors: the fleet will be an “invisible” actor, meaning it will not paint anything, but will maintain the direction and speed of all space ships, while each individual space ship will display the animation and be part of a fleet. Of course, the two actors will need to know about each other.
The Fleet
The fleet% will manage all the space ships in the game, so it will need to keep a list of all of them. There are additional add-ship and remove-ship methods to manage this list. The add-ship method will be used at the start of the game when the fleet is assembled, while remove-ship will be used whenever a space ship is hit and destroyed. remove-ship is also responsible for setting the game outcome to 'win when there are no more ships left.
The ships themselves will need to know which fleet they are part of, since their position is relative to the fleet position. When adding a new ship, the ship is informed of the fleet they are part of by calling set-the-fleet method.
1 2 3 4 5 6 7 8 9 10 11 12 13 14 15 16 17 18 |
(define fleet% (class actor% (super-new) (define ships '()) (define/public (add-ship ship) (send ship set-the-fleet this) (set! ships (cons ship ships))) (define/public (remove-ship ship) (set! ships (remove ship ships)) (send ship set-the-fleet #f) (when (null? ships) (set! game-outcome 'win))) ;; Other fleet methods and member variables here... )) |
The fleet is responsible for the movement of the ships: all ships move to the left until the left-most ship reaches the left edge of the screen, than they move down a certain height, than start moving right until the right most ship reaches the right edge and so on. To do all this work, the fleet% needs to keep track of a lot of state, which is shown below:
-
movement-speedrepresents the speed at which the fleet moves, the value is in drawing units (pixels) per millisecond. It is an initialization variable, meaning that it can be set at construction time, although we also provide a default value. -
xandyrepresent the coordinates of the entire fleet, more precisely the top left corner of the entire fleet. Since each individual ship needs this information (and it changes every game loop), theget-coordinatesmethod provides access to these coordinates. -
movement-directionis the direction in which the fleet is moving, being either'left,'rightor'down— left and right are obvious, but we also use a down movement, so the animation is smooth when the fleet drops a row. -
right-movement-limit,left-movement-limitanddown-movement-limitrepresent the limits of the arena: left and right edges where the fleet must turn and the lower level of the playing field — when the fleet reaches this height it has completed the invasion. These values depend on the size of the game window, so they are set bycanvas-size-changed, and also dynamically updated, if the user resizes the window during the game. -
drop-heightrepresents the amount the fleet drops when it turns at the edges of the screen. It should be the height of a ship, but we provide theset-drop-heightmethod to be able to set this value externally. -
Finally,
drop-limitrepresents the movement limit when the fleet moves down — this is dynamically updated each time the fleet moves down a row.
Most of these variables are initialized to some arbitrary values, but they will be updated to correct values once the fleet is added to the scene and the game begins.
1 2 3 4 5 6 7 8 9 10 11 12 13 14 15 16 17 18 19 20 21 22 23 24 25 26 27 |
(define fleet% (class actor% ;; Ship management methods unchanged... (init-field [movement-speed 0.1]) (define x 0) (define y 0) (define/public (get-coordinates) (values x y)) (define movement-direction 'left) (define left-movement-limit 0) (define right-movement-limit 100) (define down-movement-limit 100) (define drop-height 100) (define drop-limit 100) (define/public (set-drop-height h) (set! drop-height h)) (define/override (canvas-size-changed new-width new-height) (set! left-movement-limit 0) (set! right-movement-limit new-width) (set! down-movement-limit new-height)) ;; Other fleet methods and member variables here... )) |
The main job of the fleet% is to update its position and, since we want to move the fleet incrementally, we’ll override the update/delta-time method to change position based on the movement direction and the movement speed. This method is also responsible for changing direction when the fleet reaches an edge of the window, but, since this is more complex, we’ll move it into a separate method, maybe-change-direction.
1 2 3 4 5 6 7 8 9 10 11 12 13 14 |
(define fleet% (class actor% ;; Other fleed methods and variables unchanged (define/override (update/delta-time dt) (define distance (* movement-speed dt)) (case movement-direction ((left) (set! x (- x distance))) ((right) (set! x (+ x distance))) ((down) (set! y (+ y distance)))) (maybe-change-direction)) )) |
The fleet% will also change direction when the space ships reach the edges of the screen. This is somewhat complicated by the fact that the screen area occupied by the fleet changes as ships are destroyed. To know when to change direction, we’ll need a helper method, get-bounding-box which calculates the left, right, top and bottom limits of the entire fleet — technically, the top limit is unused, but it is still part of the bounding box of the fleet. get-bounding-box works by asking each individual ship for its bounding box and joining them together.
The job of the maybe-change-direction function is to obtain the bounding box for the entire fleet and check if any of its edges is past the relevant movement limit. It has a separate case for each movement direction, for example, if the current movement direction is 'left and the left side of the bounding box is less than the left-movement-limit, it changes direction to 'down and updates the drop-limit. The case where the movement direction is 'down it also checks if the bottom of the fleet reached the down-movement-limit, in which case the game outcome is set to 'lose, as the invasion was successful.
1 2 3 4 5 6 7 8 9 10 11 12 13 14 15 16 17 18 19 20 21 22 23 24 25 26 27 28 29 30 31 32 33 |
(define fleet% (class actor% ;; Other fleet methods and variables unchanged (define/private (get-bounding-box) (for/fold ([left #f] [right #f] [top #f] [bottom #f]) ([ship (in-list ships)]) (define-values (l r t b) (send ship get-bounding-box)) (values (if left (min left l) l) (if right (max right r) r) (if top (min top t) t) (if bottom (max bottom b) b)))) (define/private (maybe-change-direction) (define-values (left right top bottom) (get-bounding-box)) (case movement-direction ((left) (when (and left (< left left-movement-limit)) (set! movement-direction 'down) (set! drop-limit (+ top drop-height)))) ((right) (when (and right (> right right-movement-limit)) (set! movement-direction 'down) (set! drop-limit (+ top drop-height)))) ((down) (if (and bottom (> bottom down-movement-limit)) ;; Invasion successful (begin (set! movement-speed 0) (set! game-outcome 'lose)) (when (and top (> top drop-limit)) (set! movement-direction (if (and left (< left 0)) 'right 'left))))))) )) |
Since the fleet expects all objects it manages to have a set-the-fleet and get-bounding-box method, we can define an interface to codify this information. This can be used by other actors, and the Racket contract system to verify that the actor objects we define can be used with the fleet% class:
The Space Ships
Having the fleet ready, we need to populate it with some space ships. The game has five rows of 11 alien ships each, and, while the actual images used for the aliens are different for each row, their behavior is the same: the ships have a position within a fleet, so we need to draw them to that position, and they also have a sequence of picture frames representing the animations.
The animation for each alien ship can be captured in a structure, which holds the sequence of frames in that animation and the refresh interval. For convenience, we will also store the width and height plus the base color of each alien ship (the base color will come in handy a bit later):
Defining a structure will also define several functions to access the structure members defined, such as sprite-bitmaps, sprite-frame-time, and so on. Sometimes it is useful to define additional helper functions with the same naming convention, such as sprite-frame-count which returns the number of frames in the animation.
We can also define a helper function to construct these sprites, making sure the structure is consistent: all pictures are converted to bitmaps and the width and height is correctly calculated.
1 2 3 4 5 6 7 |
(define (make-sprite picts color #:refresh-interal (frame-time 500)) (define width (apply max (map pict-width picts))) (define height (apply max (map pict-height picts))) (define bitmaps (for/list ([p (in-list picts)]) (pict->bitmap p 'smoothed #:make-bitmap make-screen-bitmap))) (sprite bitmaps frame-time width height color)) |
We can now define the animations for our alien ships. Here is the one for the first alien ship, the rest of them are available in the game source.
A space-ship% is an actor% which can be part of a fleet%, so it also implements the fleet-member<%> interface. Below is the first part of the definition: when constructing a space-ship%, the sprite and the position within the fleet needs to be provided (pos-x and pos-y). The object also keeps a reference to the fleet it is part of, since it will need to compute its position on the screen from the fleet position and its own coordinates.
The set-the-fleet method implementation is trivial: it just keeps the reference to the fleet, while get-bounding-box will calculate the space occupied by this space ship from the fleet position, its own position within the fleet and the dimensions of the sprite:
1 2 3 4 5 6 7 8 9 10 11 12 13 14 15 16 17 18 19 20 21 22 23 |
(define space-ship% (class* actor% (fleet-member<%>) (init-field sprite pos-x pos-y) (field [the-fleet #f]) (super-new) (define/public (set-the-fleet f) (set! the-fleet f)) (define/public (get-bounding-box) (define top-left-x (- pos-x (/ (sprite-width sprite) 2))) (define top-left-y (- pos-y (/ (sprite-height sprite) 2))) (define-values (dx dy) (if the-fleet (send the-fleet get-coordinates) (values 0 0))) (values (+ dx top-left-x) (+ dx top-left-x (sprite-width sprite)) (+ dy top-left-y) (+ dy top-left-y (sprite-height sprite)))) ;; Other space-ship% methods defined... )) |
The update function for the space ship will need to update the animation frames only: its position within the fleet never changes, and the fleet is responsible for calculating the position on the screen, and moving the space ships. The animation is done by calculating the frame to be displayed, frame-index, based on the amount of time passed since the object was created and the frame time defined for the sprite itself. Since we use the time since the actor was created, we override the update/life-time method:
1 2 3 4 5 6 7 8 9 10 11 12 13 14 |
(define space-ship% (class* actor% (fleet-member<%>) ;; Other space-ship% methods remain unchanged ... (define frame-index 0) (define/override (update/life-time life-time) (define frame-time (sprite-frame-time sprite)) (define frame-count (sprite-frame-count sprite)) (define steps (exact-truncate (/ life-time frame-time))) (set! frame-index (modulo steps frame-count))) ;; More space-ship% methods defined... )) |
Drawing the space ship is done by updating the bitmap and the position in the base actor% class, since the actor does the actual drawing. We just override the paint method to calculate the screen position of the space ship from the fleet coordinates and the actual bitmap from the frame-index which was updated in the update/life-time method. Once all these are set up, we call the paint method in the parent class using (super paint canvas dc).
Why not update the bitmap, x and y values from the update method? The problem is that we have no control over the order in which updates are called for the actors. When update is called for a space ship, the update for the fleet might not be called yet, so the fleet position is not correct yet. When paint is called, all updates are completed.
1 2 3 4 5 6 7 8 9 10 11 12 13 14 15 16 |
(define space-ship% (class* actor% (fleet-member<%>) ;; Other space-ship% methods remain unchanged ... (inherit-field bitmap x y) (define/override (paint canvas dc) (define-values (dx dy) (if the-fleet (send the-fleet get-coordinates) (values 0 0))) (set! x (+ pos-x dx)) (set! y (+ pos-y dy)) (set! bitmap (list-ref (sprite-bitmaps sprite) frame-index)) (super paint canvas dc)) )) |
To help creating a nicely aligned block of space ships for our fleet, we can write a helper function to calculate the position of each ship, create the space ships and add them both to the scene and to the fleet:
1 2 3 4 5 6 7 8 9 10 11 12 13 14 15 16 17 18 19 20 21 22 23 24 |
(define (create-space-ships fleet [invaders (list zabrak zakdorn zaldan zalkon zarbi)] [columns 11]) ;; Find the width and height of each alien ship, the final cell size will be ;; the maximum one, so all align nicely. (define width (apply max (map sprite-width invaders))) (define height (apply max (map sprite-height invaders))) (define spacing (max (* 1/5 width) (* 1/5 height))) ;; Note that the coordinates of of the space ship is in the center of the ;; image! (for* ([(sprite row) (in-indexed (in-list invaders))] [column (in-range columns)]) (define space-ship (new space-ship% [sprite sprite] [pos-x (+ (* column (+ width spacing)) (* 1/2 width))] [pos-y (+ (* row (+ height spacing)) (* 1/2 height))])) (add-actor space-ship) (send fleet add-ship space-ship)) (send fleet set-drop-height height)) |
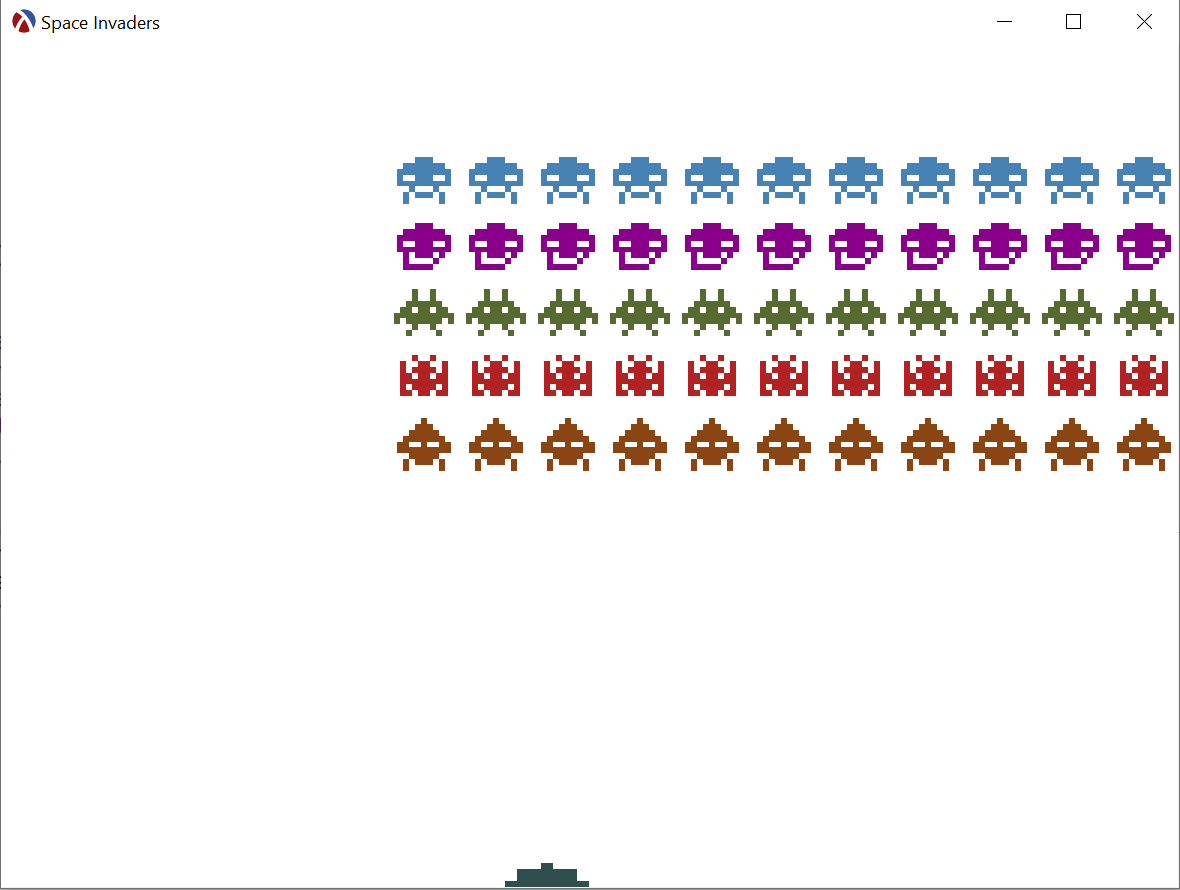
With the fleet and space ships ready, let’s see them in action:
Begin the Invasion
We have a fleet and we have a cannon that can shoot lasers, but if you put both together, you will notice that the lasers don’t hit anything.
The update/delta-time method in the laser-shot% class would remove the actor when the shot reaches the top of the screen. We keep that functionality, since this is the case where nothing was hit by this shot, but the laser shot will also need to check if it hit any space ships. It does that by iterating over all the space ships in the scene and checking if the tip of the object is inside the bounding box of the space ship — this is not an exact collision test, since the ships are not rectangles, but it is sufficient for this game.
If the laser shot hits a space ship, it sends the destroy message to the space ship than the laser shot removes itself from the scene, since it completed its purpose:
1 2 3 4 5 6 7 8 9 10 11 12 13 14 15 16 17 18 19 20 |
(define laser-shot% (class actor% ;; Rest of the laser shot class is the same... (define/override (update/delta-time dt) (define distance (* speed dt)) (set! y (- y distance)) (if (< y 0) ;; The laser shot has left the arena (remove-actor this) (let ((tip-x x) (tip-y (- y (/ (send bitmap get-height) 2)))) (for/or ([o (in-list scene)] #:when (is-a? o space-ship%)) (define-values (left right top bottom) (send o get-bounding-box)) (define hit? (and (> x left) (< x right) (> y top) (< y bottom))) (when hit? (send o destroy) (remove-actor this)) hit?)))) )) |
The destroy method for the space-ship% could simply remove the space ship from the scene and the fleet, but we can improve the game by adding explosions. These will be animated pictures, or sprites, just like the individual aliens, but these sprites need to be the same color as the destroyed space ship. The animation frames are defined the same way as for the aliens themselves (see the game source for the actual definitions), but we add a helper method to construct sprites of different color.
An explosion% object will replace a space ship in the fleet, so it needs to be a fleet-member<%>. The constructor accepts a color, plus a position in the fleet, the position of the space ship that was just hit. The paint method is similar to the space ship paint method, but the update method is slightly different: unlike a space ship, which will cycle through the animation frames, an explosion will remove itself from the scene and the fleet once all the animation frames are played out:
1 2 3 4 5 6 7 8 9 10 11 12 13 14 15 16 17 18 19 20 21 22 23 24 25 26 27 |
(define explosion% (class* actor% (fleet-member<%>) (init-field color pos-x pos-y) (super-new) (field [the-fleet #f]) (define/public (set-the-fleet f) (set! the-fleet f)) (define sprite (make-explosion-sprite color)) (define/public (get-bounding-box) ;; Same implementation as for space-ship% ) (define frame-index 0) (define/override (update/life-time life-time) (define frame-time (sprite-frame-time sprite)) (set! frame-index (exact-truncate (/ life-time frame-time))) (when (>= frame-index (sprite-frame-count sprite)) (send the-fleet remove-ship this) (remove-actor this))) (define/override (paint canvas dc) ;; Same implementation as for space-ship% ) )) |
The only remaining thing is to implement the destroy method in the space-ship% class: the explosion is created and added to the fleet and the scene and the ship removes itself from the fleet and the scene:
1 2 3 4 5 6 7 8 9 10 11 12 13 14 |
(define space-ship% (class* actor% (fleet-member<%>) ;; Other space ship methods unchanged... (define/public (destroy) (define explosion (new explosion% [color (sprite-color sprite)] [pos-x pos-x] [pos-y pos-y])) (add-actor explosion) (remove-actor this) (send the-fleet add-ship explosion) (send the-fleet remove-ship this)) )) |
Note how the task of hitting space ships is split between several actors: the laser-shot% checks for collisions and informs the space-ship% that it was destroyed, the space-ship% constructs and registers an explosion% in the same position as it used to be and the explosion% will remove itself once all its animation frames have been played. Let’s see it in action:
Unfinished Business
If you just want to play Space Invaders, you can find plenty of game implementations which are readily available and have more features and better graphics. Hopefully you are here because you are interested in Racket and if this is the case, you can take the source code, study it and improve it. Below are some ideas on what to do next:
The game graphics are pretty basic, but these can be improved by simply overriding the paint method of various actors. Since these use the racket drawing functionality, there are many possible implementations.
Game reset and game over is handled incompletely. While the win/lose condition is detected and the source code also displays an overlay when the game is over, trying to run the game again by calling run-game-loop will not work, since either there will be no space ships if the game was won or the fleet would be at the bottom if the game was lost.
What is a game without a game score? Each space ship could have a points value which is added to a score when the ship is destroyed. Displaying the score could be done by implementing a game-score% actor, whose paint method shows the score in the corner of the screen.
Ships could be made to move faster by increasing game speed as ships are destroyed. This can be done in the fleet% object by calculating the speed as a function of the number of remaining ships.
A more complex task would be to have ships drop bombs. The fleet% would need to coordinate which ships can drop them, since only ships that don’t have anyone below them can drop the bombs, but the bombs can be implemented as actors just like the laser-shot% object.
And of course, if you are up to the task, you could try implementing bunkers which are actors that protect the cannon by “absorbing” some of the bombs and taking damage themselves, being partially destroyed.
Enjoy.