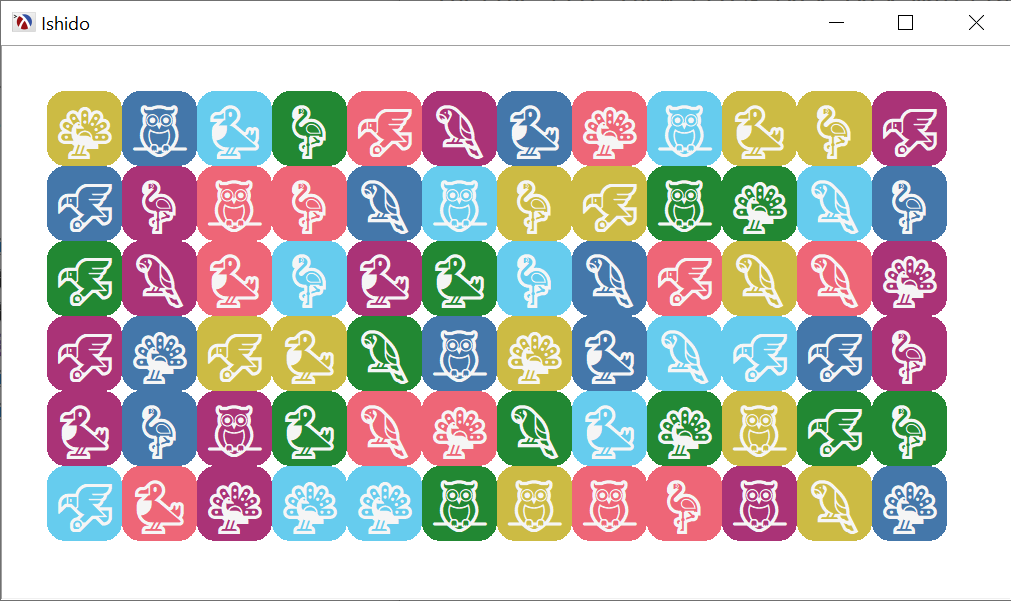
Ishido
… in which we attempt to recreate a game from the nineties using the Racket graphical facilities and we manage to do it in less than 1000 lines of code.
The Game Play
Instead of explaining the game, it is easier to show the game play. In the video below, the valid tiles are marked with their score, but this would be considered cheating in the actual game. The objective here, however, is to program the game, not to play it.
By the way, if you are in a hurry, you can go directly to the the source code for the game.
The game is played on a 8x12 board with 72 tiles. There are six colors and six images which combined produce 36 unique tiles. Two of each tile are combined to make the playing set. The objective of the game is to place all the tiles on the board with the following rules:
-
a tile must be placed next to one or more tiles
-
a tile can be placed next to another one if either their color or image match. If there are multiple tiles around the tile, each neighbor must match either the color or the image.
The game starts with the first six tiles already on the board, one in each corner and two in the middle. The tiles are selected such that each possible color and each possible image is present on the board, thus ensuring that the very first tile can be placed on the board.
Scoring is done to reflect the complexity of the placement, with 1 point awarded if a tile is placed next to a single tile, 2 points for placing it against two tiles, 4 points for placing it against 3 neighbors and 8 points for placing it against 4.
The game ends when either there are no more tiles to be placed on the board or there is no valid location on which to place a tile.
The Libraries
Given that this is an interactive game where the user needs to drag tiles on a board, the easiest way to implement this game is to use snips and a pasteboard. The pasteboard% is one of the two editors provided by the Racket GUI framework and it will handle most of drag and drop functionality which the game requires. To use it, we will need to provide two classes:
-
a
snip%class which represents a tile. A snip is an object which knows its size and how to draw itself. You can do cool things with snips, such as rendering maps and even basic GUI controls. -
a
pasteboard%class which manages the snips (it can also draw things of its own). While we can use thepasteboard%directly for testing purposes, we will need to define our own class to implement the restrictions imposed by the game.
The game will also use the racket/draw facilities for drawing directly to a device context. The draw functions provided by snip% and pasteboard% already use dc<%> objects, and while we could have used the pict library for rendering, for this simple case, it was thought unnecessary.
The Assets
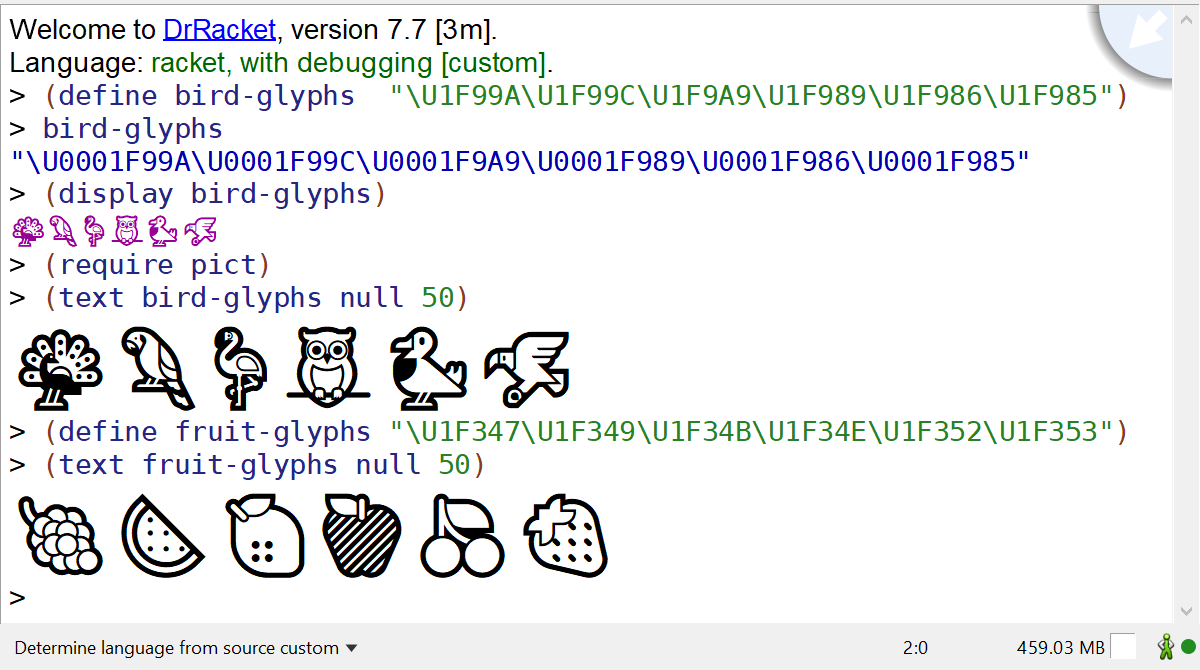
While the game board can be drawn using just lines, the game tiles will need six colors and six images, and it would help if these images would be nice ones, rather than using simply a circle, square and triangle shapes. The Unicode character set has lots of emoji characters to choose from, and these are directly supported by Racket, which means that they can be stored in strings.
In the game code, I choose to represent the unicode characters using the \U escape sequence followed by a code point, and during development using display or the text pict constructor to see the actual glyphs in the DrRacket REPL:
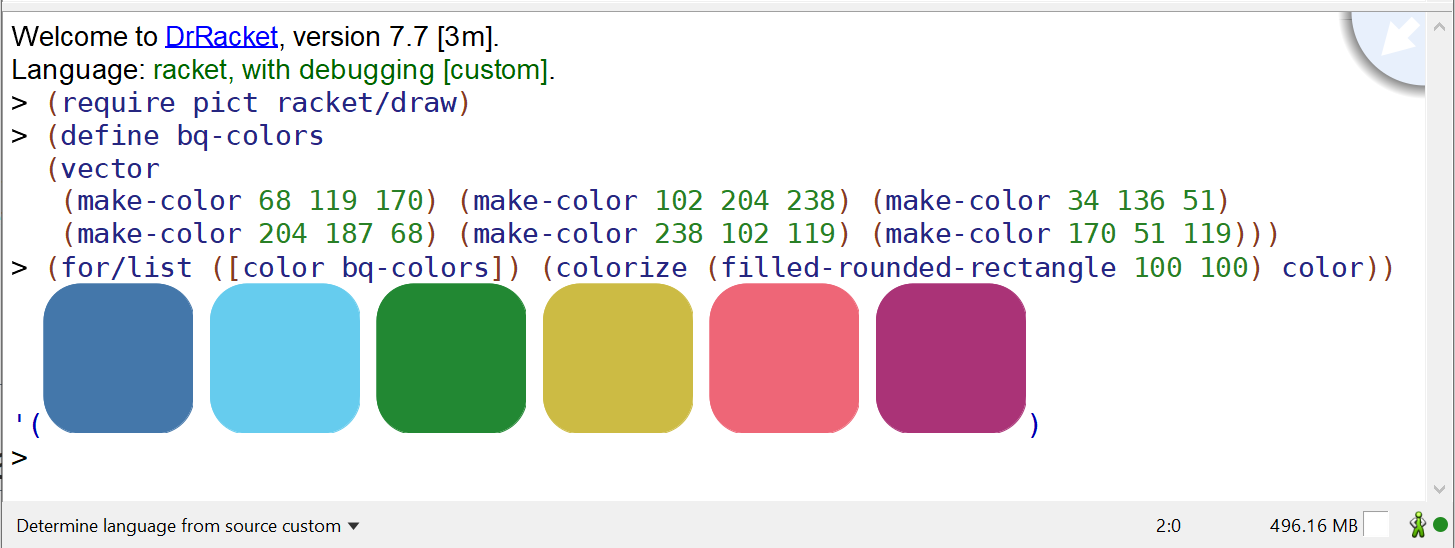
Choosing six colors can also be a difficult task if we want colors which look nice, are visually distinct and are also distinct for color-blind people. I don’t know how to chose colors which meet all this criteria, so my preferred way is to find color schemes defined by others, in this case, one of Paul Tol’s Color Schemes, the “bright qualitative” one:
The Theme
Rather than storing the drawing assets (color and glyph) in each tile object, a helper class can be used to manage the common functionality and assets for all snips. A theme class also allows changing the “theme”, that is the colors and images at runtime — this is not implemented in this game, but could be added easily. Even without the ability to change themes, moving some common functionality in a separate class keeps the tile class simpler.
In addition to managing the graphics assets for drawing, the theme class also provides the size of each tile (the cell-width and cell-height fields). These are calculated by the board itself when it is resized and communicated to the theme and from here used by all tiles in the game:
1 2 3 4 5 6 7 8 9 10 11 12 13 14 15 16 17 18 19 20 21 22 23 24 25 |
(define theme% (class object% (init-field colors glyphs) (super-new) (define cell-width 100) (define cell-height 100) (define font (send the-font-list find-or-create-font 24 'default 'normal 'normal)) (define/public (get-color key) (vector-ref colors (key-material key))) (define/public (get-brush-for-material key) (define color (get-color key)) (send the-brush-list find-or-create-brush color 'solid)) (define/public (get-glyph key) (string (string-ref glyphs (key-sigil key)))) (define/public (get-font) font) (define/public (get-text-foreground) "whitesmoke") (define/public (get-glyph-size dc key) ;; ... (values glyph-width glyph-height)) (define/public (get-cell-size) (values cell-width cell-height)) (define/public (set-cell-size w h) (set! cell-width w) (set! cell-height h)) )) |
The Tiles
The tiles represent the objects that can be moved on the board and they are implemented using snips. Two things are needed to create a new snip: define a snip class (not to be confused with a racket class%) and create a class derived from snip% overriding the get-extent and draw methods.
The snip class is used for serializing and de-serializing snip objects, but even though we don’t use this functionality in the game, we still need to define one. The definition is identical for any snip class, except they need to have unique names. Note that the snip class is actually an instance of snip-class% and not a class in itself:
We define our own tile% class derived from the snip% class. As far as the pasteboard is concerned, the new object needs to: (1) set the snip class for each instance (see the set-snipclass call below, (2) define a get-extent method which the pasteboard can use to determine the size of the snip and (3) define a draw method which is used to draw the snip.
In addition to the snip interface, also has a key a theme and a location. The key is a structure which contains the color and glyph codes for the tile and the theme is an object which holds the colors and glyphs used by the game (the tile class will ask the theme for the actual color to use corresponding to its key). The key and the theme are used for drawing the snip. Finally, the location is a structure which holds the location of the tile on the board (column and row). It is not used by the tile class at all, but it the pasteboard will need to know the location of each tile, so might as well store it inside the tile object you can find the full definition in the game source code.
1 2 3 4 5 6 7 8 9 10 11 12 13 14 15 16 17 |
(define tile% (class snip% (init-field key theme [location #f]) (super-new) (send this set-snipclass ishido-tile-snip-class) (define/public (get-location) location) (define/public (set-location l) (set! location l)) (define/public (get-key) key) (define/override (get-extent dc x y w h descent space lspace rspace) ;; get-extent method implementation ) (define/override (draw dc x y . other) ;; draw method implementation ) )) |
With the tile snip defined, we can write a quick test program to see how it works. Here we will use just a plain pasteboard% which will display the snip and allow moving them around with the mouse. There are several objects which make up the “game”:
- the
bq-colors, andbird-glyphsdefine the colors and images to use for the tiles and they are managed by thethemeobject - the
boardis simply thepasteboard%instance we’ll use toplevelis the toplevel GUI window for the application, an instance of theframe%classcanvasis theeditor-canvas%which acts as the view for thepasteboard%(the pasteboard itself only manages snips, displaying is handled by one or moreeditor-canvas%instances)
The code also creates six tiles, one for each color and image and inserts them into the pasteboard.
1 2 3 4 5 6 7 8 9 10 11 12 13 14 15 16 17 |
(define bq-colors (vector (make-color 68 119 170) (make-color 102 204 238) (make-color 34 136 51) (make-color 204 187 68) (make-color 238 102 119) (make-color 170 51 119))) (define bird-glyphs "\U1F99A\U1F99C\U1F9A9\U1F989\U1F986\U1F985") (define theme (new theme% [colors bq-colors] [glyphs bird-glyphs])) (define board (new pasteboard%)) (define toplevel (new frame% [label "Ishido"] [width 850] [height 600])) (define canvas (new editor-canvas% [parent toplevel] [editor board])) (for ([material (in-range 6)] [sigil (in-range 6)]) (define tile (new tile% [key (key material sigil)] [theme theme])) (send board insert tile)) (send toplevel show #t) |
The result is an interactive application, which allows dragging the snips around. The pasteboard% provides a lot of functionality out of the box, but it still needs to be further customized to restrict its functionality according to the rules of the game (for example, snips should only be placed in precise positions on a board):

The Pouch
Having defined the tiles, we need to produce 72 of them, preferably in random order, so it they can be used in the game. To generate all the possible tiles, we can use nested for loops over the all the possible colors and images:
The previous list is ordered by color and image, and we need to shuffle it:
Finally, and this is the tricky bit, the first six tiles need to have unique colors and images. This is because the first six tiles are already on the board when the game starts and to ensure that the user can always place the next tile, all the colors and images need to be on the board. To achieve this, we loop over the shuffled tiles and move the first six unique tiles to the front. Doing this ensures that, while the first tiles are unique, they also start in a random order for each game.
1 2 3 4 5 6 7 8 9 10 11 12 13 14 15 16 17 18 19 20 21 22 23 24 25 26 27 |
(define the-pouch (let loop ([remaining shuffled] [head '()] ; contains unique material + sigil tiles [tail '()] ; contains all other tiles ;; materials we haven't seen yet [materials (for/list ([x (in-range 6)]) x)] ;; sigils we haven't seen yet [sigils (for/list ([x (in-range 6)]) x)]) (cond ((null? remaining) (append head tail)) ((and (null? materials) (null? sigils)) ;; We have seen all materials and sigils (append head tail remaining)) (#t (let ([candidate (car remaining)]) (match-define (key material sigil) (send candidate get-key)) (if (and (member material materials) (member sigil sigils)) (loop (cdr remaining) (cons candidate head) tail (remove material materials) (remove sigil sigils)) (loop (cdr remaining) head (cons candidate tail) materials sigils))))))) |
We can update our small test program to insert the contents of the pouch into the pasteboard and place them side by side — we used the move-to method on the pasteboard to move the tiles next to each other, otherwise, they would just sit one on top of another. Note how the first six tiles have unique colors and images:
1 2 3 4 5 |
(define-values (cw ch) (send theme get-cell-size)) (for ([(tile index) (in-indexed the-pouch)]) (define-values (row col) (quotient/remainder index 12)) (send board insert tile) (send board move-to tile (* col cw) (* row ch))) |
The Board
The pasteboard% object can manage tile snips and offers “dragging” functionality for free, but it allows too much freedom when it comes to moving tiles around. We’ll need to implement our own board class, derived from pasteboard% and adapting it so it is suitable as a Ishido game board. From a high level perspective, the board needs to implement the following:
- draw the game board.
- draw additional “things”, such as the game score and the “game over” message, plus the “assistants” such as the score for each valid cell.
- restrict tile snip positions to specific locations (i.e the squares on the board)
- allow dragging a tile from the “next tile” square onto a valid location only, according to game rules
- manage the tiles in the game, the ones which are on the board and the ones which are in the pouch.
The pasteboard is the most complex part of the game, and, when counting lines of code, it is half of the program, but it all starts with deriving from pasteboard%:
1 2 3 4 5 |
(define board% (class pasteboard% (init-field theme) (super-new) )) |
Adjusting the Size
Rather than having static board dimensions, it is best to write GUI applications such that they make efficient use of the available space. All drawing and position calculations will be done based on knowing where the board is, and the on-display-size method will calculate these positions. The on-display-size is automatically called by the system to inform the pasteboard that its size has changed, usually in response to changing the size of the canvas which displays the pasteboard.
Before we implement this class method, we need to define the fields which hold the positions and dimensions for the board and the “next tile” square, and the role of on-display-size is to calculate values for these fields based on the canvas dimensions:
1 2 3 4 5 6 7 8 9 10 11 12 13 14 |
(define board% (class pasteboard% (init-field theme) (super-new) (define-values (board-x board-y board-width board-height) (values 0 0 0 0)) (define-values (next-tile-x next-tile-y next-tile-width next-tile-height) (values 0 0 0 0)) (define/augride (on-display-size) ;; ... ) )) |
Calculating the board position and dimensions is not particularly difficult, they are rectangles after all, but there are a few caveats:
- a pasteboard can be displayed in more than one canvas and each canvas can have different dimensions, so we cannot talk about the dimensions of the pasteboard itself. Still, the most common use case is to have a single canvas displaying the pasteboard, so we can just get that canvas and query its dimensions, this will do fine for this game.
- an editor canvas has an “inset” which is an internal border around the canvas, this default to 5 drawing units. Drawing cannot be done in this inset area, and all calculations need to take this into account (an alternative is to create the
editor-canvas%with a horizontal and vertical inset of 0). - the lines drawn by the
racket/drawlibrary have a width, and the actual line is drawn centered on the ideal direction given by the drawing coordinates. Since the drawing region is clipped around the valid drawing area, drawing the line right on the edge of the area will result in half of the line being outside, appearing as if the line is thinner. To account for this, the code uses aninternal-borderto slightly reduce the available drawing area, so lines along the edge are drawn at full width. - some if the drawing APIs use a
boxto obtain “output” values. For example, theget-viewmethod will return the values in boxes which need to be defined before the call, rather than returning four values.
1 2 3 4 5 6 7 8 9 10 11 12 13 14 15 16 17 18 19 20 21 22 23 24 25 26 27 28 |
(define/augride (on-display-size) (define admin (send this get-admin)) (define canvas (send this get-canvas)) (define internal-border 2) (when (and admin canvas) (let ((x (box 0)) (y (box 0)) (w (box 0)) (h (box 0))) (send admin get-view x y w h #f) ;; NOTE: the x, y coordinates of the board need to be adjusted for ;; the editor canvas inset, but the width and the height do not. (set! board-x (+ internal-border (unbox x))) (set! board-y (+ internal-border (unbox y))) (set! board-width (- (* 0.8 (unbox w)) internal-border internal-border)) (set! board-height (- (* 1.0 (unbox h)) internal-border internal-border)) (define-values (cell-width cell-height) (values (/ board-width board-columns) (/ board-height board-rows))) (set! next-tile-width (* 1.7 cell-width)) (set! next-tile-height (* 1.7 cell-height)) (set! next-tile-x (+ board-x board-width (/ (- (unbox w) board-x board-width internal-border next-tile-width) 2))) (set! next-tile-y (+ (unbox y) internal-border)) (send theme set-cell-size cell-width cell-height) (refresh-all-snips)))) |
With the size calculations complete, we need to inform all snips and the canvas that the dimensions have changed: we set the cell width and height in the theme than call refresh-all-snips since they will need to be updated. The pasteboard% does not provide a simple interface to obtain all the snips, instead the snips are stored in a linked list: the first snip is obtained using find-first-snip, than next ones are obtained by calling next. The refresh-all-snips will inform the snip administrator that the snip needs to be resized and it also calls place-tile-on-board, since the position of the snip might have changed too. Also note that the entire block is wrapped inside a begin-edit-sequence/end-edit-sequence call. Normally, as each snip is updated, a redraw operation is queued immediately, and since we have to update many snips, this will result in a lot of redraws. The calls to begin and end edit sequence ensure that redraw requests are postponed until a block of operations is completed, and a single redraw takes place at the end of the call:
The place-tile-on-board method is a helper which positions a tile on the board according to its location, if the tile has one, or places it in the “next tile” space if it does not have a location. The function simply calls location->xy to determine the coordinates for a location and moves the tile by calling move-to:
1 2 3 4 5 6 7 8 |
(define/private (place-tile-on-board tile) (define-values (cell-width cell-height) (send theme get-cell-size)) (if (send tile get-location) (let-values ([(x y) (location->xy (send tile get-location))]) (send this move-to tile x y)) (send this move-to tile (+ next-tile-x (/ (- next-tile-width cell-width) 2)) (+ next-tile-y (/ (- next-tile-height cell-height) 2))))) |
location->xy is a simple function which just multiplies the row and column of a location with the cell width and height:
1 2 3 4 5 6 |
(define/private (location->xy l) (define-values (cell-width cell-height) (send theme get-cell-size)) (match-define (location column row) l) (values (+ board-x (* cell-width column)) (+ board-y (* cell-height row)))) |
We have not covered the drawing of the board itself, but here is a demo of how it all works. Since the sizes are all dynamically calculated, the board is drawn such that it fills up the available area while the tiles are resized to fit the squares on the board and are always moved to the correct location after the resize, so they appear to stay in their current position:
Drawing the Board
A pasteboard has an on-paint method which can be used to draw the non-interactive parts of the application. This method is invoked twice for each canvas which shows the pasteboard: once before the snips are drawn and once after. In addition to this, the method is invoked once for every canvas which displays the pasteboard, but we don’t need to worry about that here, as there is only one canvas.
The before? argument for the on-paint can be used to determine if this is the call for drawing the background layer (before snips are drawn) or the foreground layer (after the snips are drawn). Out implementation simply has two sections, one for each case:
1 2 3 4 5 6 7 8 9 10 11 12 13 14 15 16 17 18 19 20 21 |
(define/override (on-paint before? dc . other) (define canvas (send this get-canvas)) (when canvas (when before? (send dc clear) (define vinset (send canvas vertical-inset)) (define hinset (send canvas horizontal-inset)) (define-values (old-origin-x old-origin-y) (send dc get-origin)) (send dc set-origin hinset vinset) (draw-ishido-board dc) (maybe-highlight-location dc) (show-valid-drop-locations dc) (show-score dc) (send dc set-origin old-origin-x old-origin-y)) (unless before? (when game-over? (if winning? (draw-centered-message dc "Game Over. You Win!") (draw-centered-message dc "Game Over")))))) |
The method is fairly straightforward and delegates the actual drawing to different functions, one for each of the logical parts of the board: draw-ishido-board draws the board, maybe-highlight-location will highlight the location where a tile would be dropped, show-valid-drop-locations will mark the valid drop locations, wile show-score displays the score. The implementation for these functions is just making calls into the racket/draw facilities and have been left out, but you can have a look at the game source code for their implementation.
Moving the Tiles
The pasteboard will handle moving the tiles by dragging them with the mouse and we’ll allow the user to do so freely. However, after the user released the tile, the tile should be moved to the closest valid location, or back to the “next tile” square if the user attempted to drop it in an invalid place.
The after-interactive-move method of the pasteboard is invoked when the user finished dragging a tile. Interestingly, this method does not receive the tile (i.e. the snip) that was moved, instead it receives the last mouse event that completed the drag. This is because the pasteboard supports multiple selection, and all selected snips are moved with a drag event. Our game logic will ensure that only one snip will be selected at one time, and this snip can be found using the find-next-selected-snip method. The drop location is found using the xy->location helper function which converts mouse coordinates into board locations, and the location is checked for validity (i.e. are there compatible neighbors) using valid-drop-location?. If the new location is valid, the piece is placed at this location and a new tile is drawn from the pouch by the on-new-tile method).
Finally, since several updates are done, the canvas is refreshes to draw the updated game configuration:
1 2 3 4 5 6 7 8 9 10 11 12 13 14 15 |
(define/augment (after-interactive-move event) (define piece (send this find-next-selected-snip #f)) (unless (send piece get-location) ;; Set the new location, only if the piece does not already have one. (define drop-location (xy->location (send event get-x) (send event get-y))) (when drop-location (define location-score (valid-drop-location? piece drop-location)) (when location-score (send piece set-location drop-location) (set! score (+ score location-score)) (on-new-tile)))) ;; If we don't update the location, the piece will be moved back (place-tile-on-board piece) (set! highlight-location #f) (send (send this get-canvas) refresh)) |
(Un) Selecting the Tiles
The pasteboard implements selecting snips in a way that makes sense for an editor: clicking on a snip will select it, clicking on another snip will un-select the first one and select the second one. However it also supports multiple selection when holding the shift key and allows selecting all snips in an area by dragging the mouse to select a region.
Disabling the region selection can be done by calling the set-area-selectable method on the pasteboard, and while we’re at it, we can also disable the selection corners on snips by calling set-selection-visible:
Disabling multiple selection by holding the shift key is more complicated and needs to be done in the after-select method, which is invoked after each snip is selected or unselected. Since we’ll be un-selecting some snips inside this method, this method will be invoked recursively and needs to be written carefully to avoid infinite recursion. This method needs to do the following:
- Put this snip in the front of the snip list, so it will be dragged in front of all other snips — we don’t really care of the actual order of snips in the pasteboard, so we freely reorder them as needed.
- Find any other selected snips and un-select them, we do this in two stages, as we cannot un-select snips while traversing the list, as this would break the traversal. First, we collect the other selected snips in
other-selected-snips, than we actually un-select them. - finally, since the select status of snips might have changed, we inform the canvas that it needs to be refreshed.
1 2 3 4 5 6 7 8 9 10 11 12 13 14 15 16 17 18 |
(define/augment (after-select snip on?) (when on? (send this set-before snip #f) (define other-selected-snips (let loop ((other (send this find-next-selected-snip #f)) (result '())) (if other (let ((next (send this find-next-selected-snip other))) (if (eq? snip other) (loop next result) (loop next (cons other result)))) result))) (for ([snip other-selected-snips]) (send this remove-selected snip)) (send (send this get-canvas) refresh))) |
Enforcing the Game Rules
The after-interactive-move function is really the “central” function for the game rules: invoked after a tile is dropped, it checks that the drop location is valid and assigns that location to the tile and draws a new tile. If the location is invalid, the tile is moved back to the “next tile” square. That function makes use of several helpers, which we’ll discuss here.
The first helper we need is a function which converts some coordinates on the board to a location (column and row) on the board. xy->location does that, and it simply looks at the board position and cell size to determine this:
1 2 3 4 5 6 7 8 9 10 11 |
(define/private (xy->location x y) (define canvas (send this get-canvas)) (define-values (cell-width cell-height) (send theme get-cell-size)) (define adjusted-x (- x board-x (send canvas horizontal-inset))) (define adjusted-y (- y board-y (send canvas vertical-inset))) (define column (exact-truncate (/ adjusted-x cell-width))) (define row (exact-truncate (/ adjusted-y cell-height))) (if (and (< row board-rows) (< column board-columns)) (location column row) ;; The X, Y coordinates are not on the board #f)) |
The next helper is a function which returns the tile at a given location (if any). It simply iterates over all the tiles on the board using the find-first-snip/next methods to look for the tile with the given location:
The valid-drop-location? function checks if a specified location is valid for a tile. It is valid if:
- the location is empty (
tile-at-locationreturns#ffor that location) - the location’s neighbors have some tiles there (tiles can only be placed next to other tiles)
- the tiles that are at the neighboring location are compatible with this tile (i.e they have either the same color or the same image).
1 2 3 4 5 6 7 8 9 10 11 |
(define/private (valid-drop-location? tile location) (and (not (tile-at-location location)) ; needs to be a free slot (let ([neighbours (for*/list ([n (neighbour-locations location)] [t (in-value (tile-at-location n))] #:when (and t (not (equal? t tile)))) t)]) (and (not (null? neighbours)) (for/and ([n neighbours]) (can-be-neighbors? (send tile get-key) (send n get-key))) ;; return the score of this location if it is valid (expt 2 (sub1 (length neighbours))))))) |
The neighbour-locations and can-be-neighbors? are fairly simple helper functions for valid-drop-location?:
1 2 3 4 5 6 7 8 9 10 11 12 13 14 15 16 17 |
(define (neighbour-locations l) (match-define (location column row) l) (define result '()) (when (< (add1 row) board-rows) (set! result (cons (location column (add1 row)) result))) (when (>= (sub1 row) 0) (set! result (cons (location column (sub1 row)) result))) (when (< (add1 column) board-columns) (set! result (cons (location (add1 column) row) result))) (when (>= (sub1 column) 0) (set! result (cons (location (sub1 column) row) result))) result) (define (can-be-neighbors? key1 key2) (match-define (key material1 sigil1) key1) (match-define (key material2 sigil2) key2) (or (equal? material1 material2) (equal? sigil1 sigil2))) |
The get-valid-locations function can be used to determine all valid locations for dropping a certain tile. It simply iterates over all locations on the board and checks if they are a valid drop location for this tile. This function can be used to display the valid drop locations (which would be cheating in a proper game), but also to determine if there are any valid locations left, since if there are none, the game is over:
Finally, the on-new-tile function is used to draw a new tile from the pouch and place it in the next location space, for the user to place it on the board. It also checks if the pouch is empty and if there are any valid locations left:
1 2 3 4 5 6 7 8 9 10 11 12 |
(define/private (on-new-tile) (if (null? pouch) (begin (set! game-over? #t) (set! winning? #t)) (let ((next-tile (car pouch))) (set! valid-drop-locations (get-valid-locations next-tile)) (send this insert next-tile) (set! pouch (cdr pouch)) (when (null? valid-drop-locations) (set! game-over? #t) (set! winning? #f))))) |
Starting the Game
Having prepared all the pieces, we need to setup everything to start a new game.
The first step in starting a new game is to clear any tiles that are inserted into the pasteboard (in case we start a new game after a game was already played). This is tricker than it sounds. The simplest way to clear the tiles is to use select-all and than clear, but this will not work, as after-select will be called for each snip which will un-select them causing an infinite loop. Instead we need to collect the snips and call remove on each one:
The next step is to prepare a new pouch and place the first size pieces on the board, pouch is created such that the first six pieces have unique colors and images:
1 2 3 4 5 6 7 8 9 10 11 12 13 14 |
(define initial-locations (list (location 0 0) (location 11 0) (location 5 3) (location 6 4) (location 0 7) (location 11 7))) (define the-pouch (let loop ([pouch (make-pouch theme)] [locations initial-locations]) (if (null? locations) pouch (let ([tile (car pouch)]) (send tile set-location (car locations)) (send board insert tile) (loop (cdr pouch) (cdr locations)))))) |
All these steps plus setting the score to an initial values are packaged in the new-game method:
The Rest
There are a few other bits of functionality which, while not necessary, will make the game nicer to use. To keep an already long blog post shorter, these will only be mentioned briefly, but you are encouraged to look at the source code for the game:
- The
after-insertmethod is invoked after a snip is inserted into the pasteboard, and we use this to check that onlytile%snips are inserted into the pasteboard and immediately place the snip at its assigned location by callingplace-tile-on-board on-interactive-moveandon-move-tomethods are invoked when dragging a snip and we use them to determine the current location where the snip would be dropped and highlight it.- the
can-resize?method is used to prevent resizing snips (since the pasteboard allows resizing them by default - finally, the pasteboard operations are available using the keyboard, so the user could move snips using the arrow keys and even delete them from the pasteboard using the delete key. To prevent this, we setup our own keymap and and map an empty function to all these keys.
Using the pasteboard% facilities is not always easy, but it is still a pretty good framework, given that the entire game could be implemented in less than 1000 of commented code. There are also practical uses of the pasteboard which don’t involve games.