Interactive Overlays With the Racket Plot Package — Update
I announced my original plot overlay implementation on the Racket Users mailing list and the Racket developers were enthusiastic about these improvements and they suggested that I contribute them to the main plot package. They also suggested a different approach for implementing this feature, which results in more flexibility for implementing overlays.
The code has now been added to the official racket plot repository and these features will be available in the next Racket release. If you want to try them now, you will need to clone and install the package locally — this blog post may be of assistance.
The new implementation relies on using existing plot renderers for the overlays themselves and it is not always obvious how to use it: the only new API functions added are set-mouse-event-callback and set-overlay-renderers methods to the snip% object returned by plot-snip. The examples below are meant as a tutorial on how to achieve basic tasks using this new functionality. For more real world examples of what is possible to build using this feature, see the original post.
Display the current value of a function
Perhaps the simplest example of overlays is to display the current value of a function at the mouse position. The code below is all that is needed to achieve this. You can evaluate it in DrRacket to obtain the plot:
1 2 3 4 5 6 7 8 9 10 11 12 13 |
#lang racket (require plot) (define ((make-current-value-renderer fn) snip event x y) (define overlays (and x y (eq? (send event get-event-type) 'motion) (list (vrule x #:style 'long-dash) (point-label (vector x (fn x)) #:anchor 'auto)))) (send snip set-overlay-renderers overlays)) (define snip (plot-snip (function sin) #:x-min 0 #:x-max (* 2 pi) #:y-min -1.5 #:y-max 1.5)) (send snip set-mouse-event-callback (make-current-value-renderer sin)) snip |
… and it looks like this:
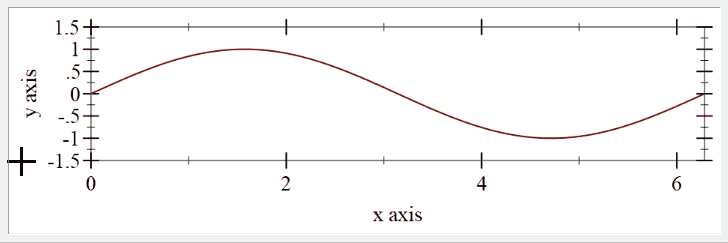
The make-current-value-renderer is a function that produces a callback to be attached to a plot snip. The callback is invoked with four parameters: the snip that calls the callback, the mouse event, and x and y coordinates for the mouse event. The x and y are in plot coordinates, meaning they map to the domain of the data displayed in the plot. The callback creates a vrule and a point-label renderer and adds these to the plot using the set-overlay-renderers. Each time set-overlay-renderers is called, any previous overlay renderers are discarded.
You can also pass #f to set-overlay-renderers and this will remove the overlays. This feature is used in the example above: when the form (and
x y (eq? (send event get-event-type) 'motion) ...) evaluates to #f, clearing the overlays. Thus, overlays are added only when the mouse is over the actual plot area, x and y are not #f and when the mouse event is a motion event.
Display the current value of a function, the fancy version
The point-label renderer used in the previous example has a limited amount of customization for the displayed text: first, the label can only be a text string, second, only the font, size and color of the text can be adjusted, but not the background. For more complex cases, there is the point-pict renderer, which allows displaying and arbitrary pict instead of the label. The built in Racket pict library allows creating sophisticated pictures, including the dc pict constructor, which allows drawing arbitrary graphics on a device context.
In the example above, the “label” displayed is constructed using a pict so that the angle is displayed as a pie slice. The make-tag function prepares the picture using standard pict constructors. The only addition is the pie-slice function, which draws a pie slice using the dc pict constructor.
1 2 3 4 5 6 7 8 9 10 11 12 13 14 15 16 17 18 19 20 21 |
(require pict racket/draw) (define (pie-slice w h angle) (define nangle (let ((npi (floor (/ angle (* 2 pi))))) (- angle (* 2 pi npi)))) (define (draw dc dx dy) (send dc draw-arc dx dy w h (- (/ nangle 2)) (/ nangle 2))) (dc draw w h)) (define item-font (send the-font-list find-or-create-font 12 'default 'normal 'normal)) (define background (make-object color% #xff #xf8 #xdc 0.8)) (define (make-tag x y) (define p (hc-append (text "sin(" item-font) (colorize (pie-slice 15 15 x) "black") (text ") = " item-font) (text (~r y #:precision '(= 2)) item-font))) (define r (filled-rounded-rectangle (+ (pict-width p) 10) (+ (pict-height p) 10) -0.2 #:draw-border? #f #:color background)) (cc-superimpose r p)) |
The point-label can be replaced with point-pict to display the fancy label, while the rest of the example remains unchanged.
1 2 3 4 5 6 7 |
(define ((make-current-value-renderer fn) snip event x y) (define overlays (and x y (eq? (send event get-event-type) 'motion) (let ((pict (make-tag x (fn x)))) (list (vrule x #:style 'long-dash) (point-pict (vector x y) pict #:anchor 'auto #:point-sym 'none))))) (send snip set-overlay-renderers overlays)) |
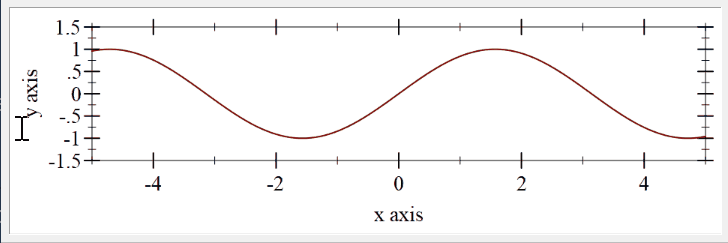
Show the tangent of a function
The plot renderers used as overlays can be any valid renderer for the plot. In the example below, the plot is set up to render the tangent of a function at the current mouse position. make-tangent-renderer is the function calculating the tangent and adding a new function renderer to the plot.
1 2 3 4 5 6 7 8 9 10 11 12 13 14 15 16 |
#lang racket (require plot) (define ((make-tangent-renderer fn derivative) snip event x y) (define overlays (and x y (eq? (send event get-event-type) 'motion) (let* ((slope (derivative x)) (intercept (- (fn x) (* slope x))) (tangent (lambda (x) (+ (* slope x) intercept)))) (list (function tangent #:color "blue") (points (list (vector x (fn x)))))))) (send snip set-overlay-renderers overlays)) (define snip (plot-snip (function sin) #:x-min -5 #:x-max 5 #:y-min -1.5 #:y-max 1.5)) (send snip set-mouse-event-callback (make-tangent-renderer sin cos)) snip |
… which looks like this:
Select a range in a plot by dragging the mouse
The mouse event that is passed to the callback can be used to check for mouse button presses and releases, which in turn can be used to implement some GUI operations. In this example, a simple drag select is implemented: the left-down mouse event marks the start of a selection, and the x position is saved into drag-start. While the left button is held down, any motion events will display a rectangles renderer with the selected area, making the selected area appear shaded. The drag operation ends when the mouse button is released, in the example, the selected area is simply removed, but other functionality can be easily implemented.
1 2 3 4 5 6 7 8 9 10 11 12 13 14 15 16 17 18 19 20 21 22 23 |
#lang racket (require plot) (define drag-start #f) (define (drag-selection-callback snip event x y) (case (send event get-event-type) ((left-down) (set! drag-start x)) ((left-up) (set! drag-start #f)) ((motion) (define overlays (and x drag-start (list (rectangles (list (vector (ivl drag-start x) (ivl -inf.0 +inf.0))) #:color "blue" #:alpha 0.2) (point-label (vector (* 0.5 (+ drag-start x)) 0) (~r (radians->degrees (abs (- x drag-start))) #:precision 1) #:anchor 'center #:point-sym 'none)))) (send snip set-overlay-renderers overlays)))) (define snip (plot-snip (function sin) #:x-min -5 #:x-max 5 #:y-min -1.5 #:y-max 1.5)) (send snip set-mouse-event-callback drag-selection-callback) snip |
… and here is what it looks like:
Histogram and bar chart plots
Histogram plots pose a special challenge as the X domain in the plot area does not directly represent the histogram slots. To convert an X plot coordinate back into the histogram slot, the following information is used:
- The X domain is the real axis, starting at 0 by default
- The distance between each histogram bar is specified by the discrete-histogram-skip parameter or the #:skip argument to the discrete-histogram renderer
- The width of each histogram bar is one minus discrete-histogram-gap, or the #:gap parameter passed to the renderer.
- Multiple histograms can be shown, each having a different starting point, as specified by the #:x-min parameter
The function xposition->histogram-slot converts an X position back to the histogram series and the slot within that series:
1 2 3 4 5 6 7 8 |
(define (xposition->histogram-slot xposition (skip (discrete-histogram-skip)) (gap (discrete-histogram-gap))) (let* ((slot (exact-floor (/ xposition skip))) (offset (- xposition (* skip slot))) (series (exact-floor offset)) (on-bar? (< (/ gap 2) (- offset series) (- 1 (/ gap 2))))) (if on-bar? (values series slot) (values #f #f)))) |
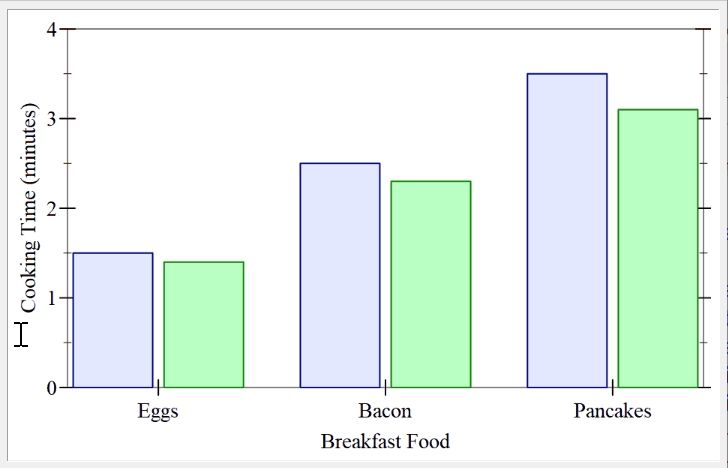
With that function defined, we can implement an “on-hover” functionality, which display the current value for the bar under the mouse:
1 2 3 4 5 6 7 8 9 10 11 12 13 14 15 16 17 18 19 20 21 22 23 24 25 26 27 28 29 |
#lang racket (require plot) (define series1 '(#(Eggs 1.5) #(Bacon 2.5) #(Pancakes 3.5))) (define series2 '(#(Eggs 1.4) #(Bacon 2.3) #(Pancakes 3.1))) (define (fetch-value-at x) (let-values (((series slot) (xposition->histogram-slot x 2.5))) (and series slot (< series 2) (let* ((s (if (eq? series 0) series1 series2)) (b (list-ref s slot))) (vector-ref b 1))))) (define (on-hover snip event x y) (define ovelays (and x y (eq? (send event get-event-type) 'motion) (let ((value (fetch-value-at x))) (and value (<= y value) (list (point-label (vector x y) (format "~a minutes" value) #:anchor 'auto #:point-sym 'none)))))) (send snip set-overlay-renderers ovelays)) (define snip (plot-snip (list (discrete-histogram series1 #:skip 2.5 #:x-min 0) (discrete-histogram series2 #:skip 2.5 #:x-min 1 #:color 2 #:line-color 2)) #:x-label "Breakfast Food" #:y-label "Cooking Time (minutes)" #:y-max 4)) (send snip set-mouse-event-callback on-hover) snip |
The end result is shown below:
How to embed plots in GUI applications
The snip object produced by plot-snip will be displayed correctly by DrRacket in the REPL window, however some more work is needed to embed plots in GUI applications. The mrlib/snip-canvas library provides a snip-canvas% object that can hold a snip. The snip-canvas% is a GUI object and can be added to a frame% or panel%. The example below extends the first example to show the plot in a separate window. The snip creation code is wrapped inside the make-plot-snip function and this function is passed to the snip-canvas% constructor to add the snip to the canvas. When the code below is run, the plot should show up in a separate frame, similar to what plot-frame does. The canvas itself can of course be created as part of a more sophisticated GUI.
1 2 3 4 5 6 7 8 9 10 11 12 13 14 15 16 17 18 19 20 |
#lang racket (require racket/gui mrlib/snip-canvas plot) (define ((make-current-value-renderer fn) snip event x y) (define overlays (and x y (eq? (send event get-event-type) 'motion) (list (vrule x #:style 'long-dash) (point-label (vector x (fn x)) #:anchor 'auto)))) (send snip set-overlay-renderers overlays)) (define (make-plot-snip width height) (define snip (plot-snip (function sin) #:x-min 0 #:x-max (* 2 pi) #:y-min -1.5 #:y-max 1.5 #:width width #:height height)) (send snip set-mouse-event-callback (make-current-value-renderer sin)) snip) (define toplevel (new frame% [label "Plot"] [width 500] [height 200])) (define canvas (new snip-canvas% [parent toplevel] [make-snip make-plot-snip])) (send toplevel show #t) |
Conclusions
This functionality will be available in the next Racket version (after 6.12). If you want to use it before that, you will have to install the plot package from the GitHub repository — these modifications run fine in Racket 6.11 and 6.12 at least.
The full running examples for the plots in this blog post are available in this GitHub Gist