A Game of Tetris (user interface)
The previous blog post introduced the Tetris game mechanics and made the game playable. In this blog post we’ll look at how to build an actual GUI application around the game mechanics: we’ll keep score, increase difficulty, peek at the next block and more. As we do that, we’ll explore some more interesting things you can do with the Racket pict library, and look at some of the GUI facilities available in Racket.
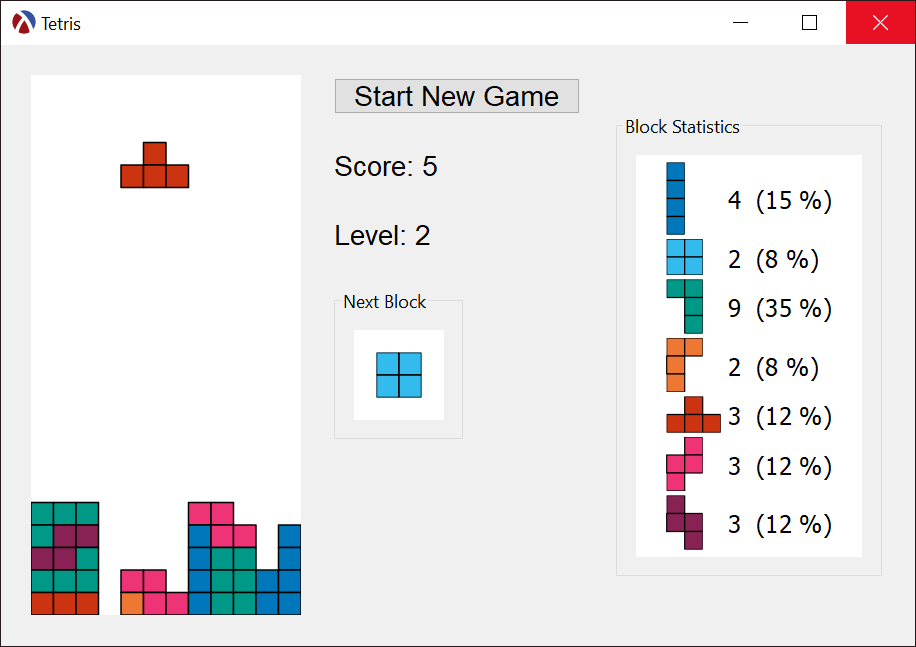
Tetris Game With Completed GUI
If you want to follow along with adding features to the program, this is the program we start with, it is the last program from the previous blog post. Also if you are in a hurry, you can download the complete program from this GitHub Gist.
End of Game Overlay
The last version of the tetris game from the previous blog post would simply stop when the playing field was full and a new block could not be spawned, and the first improvement we can make is to display a “Game Over” message when the game ends, to inform the user of what happened.
As with the rest of the game drawing, we will use a pict to construct the overlay for the “Game Over” message and we will draw it onto the canvas using draw-pict. This overlay is simply a colored text shown on top of a rounded rectangle:
The advantage of using the pict library is that the image itself can be designed inside DrRacket, before it is added to the game itself:
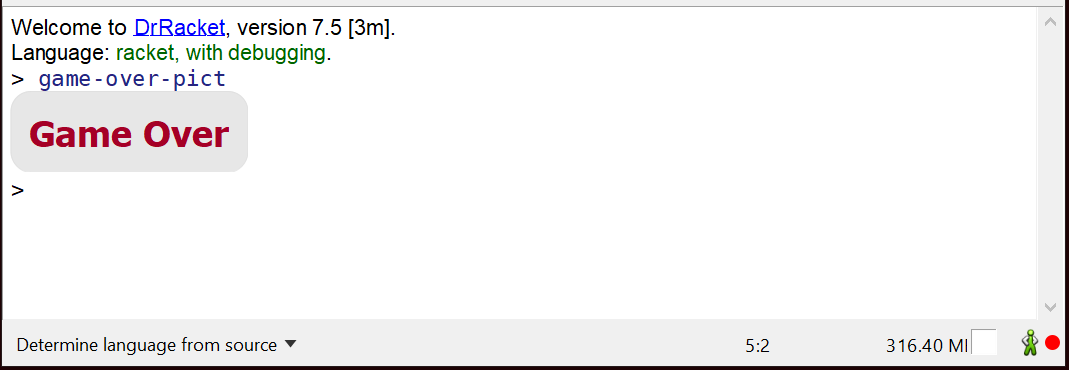
The Game Over Pict
With the picture in place, we need to update the paint function, on-tetris-paint, to show the game-over-pict at the end of the game. The end of the game is detected when the current-block is #f (meaning there is no current block), so the game over picture is drawn when current-block is #t. The drawing code also obtains the size of the drawing area and centers the picture in this area. This block is added as the last form to on-tetris-paint:
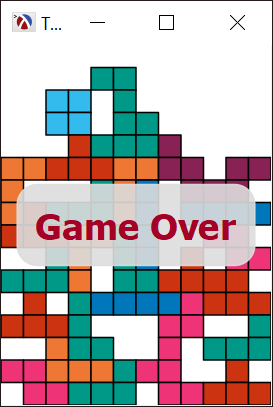
Game Over Overlay Over The Playing Field
Restart Game Button
The next improvement is to add a “Start New Game” button to the form, so the user does not have to type the (start-game) command in the REPL to start a new game. A button can be added using a button% instance, but in the current application we don’t have a place where to put it. The current application just uses a canvas% inside a frame% and all the drawing is done inside this canvas. The layout is very simple:

Original Widget Hierarchy
To make room for the new widgets which we will add to the application, we must introduce container controls, these are controls which can hold widgets such as buttons, messages or canvas objects. These widgets and containers form a tree hierarchy and, at the end of the blog post, the widget hierarchy will look like the picture below. Even for a simple application like this, the widget hierarchy can become large and complex very quickly, but we will update the application step by step, to make things easier to understand.

Updated Widget Hierarchy
To avoid confusion, the name of the top-level window was changed from frame to toplevel and the playing field canvas was renamed from canvas to playing-field, since there will be multiple canvas objects in the application.
The first step is to add a horizontal-panel% instance as the first child of the toplevel frame object. The horizontal panel will arrange all its contents from left to right. The border argument represents the amount of space to leave around the panel while the spacing argument specifies the amount of space between the children added to this panel:
The playing-field canvas% will need to be re-parented to the game-panel:
Next, we’ll add a vertical-panel% which will hold the various controls for the game (we’ll add only the “Start New Game” button in this section, but there will be several added later in the blog post). For this panel, we also specify an alignment mode, which defines how controls are aligned relative to each other. In this case, the child widgets in the panel will all be aligned vertically to the left and horizontally from top to bottom:
Finally, we can add the button% to this panel. The button is a widget which allows user input (clicking on the button), and the function to call when the user clicks the button is specified as the callback parameter. The callback is a function which takes two arguments: the button itself and the event which triggered the callback. In our case, we don’t use these arguments, so the callback simply invokes start-game which resets the playing field and re-initializes the game state (the start-game function was defined in the previous blog post):
Order of widget instantiation is important when working with GUI controls: the horizontal and vertical panels will lay out objects in the order they are added to the control. In our code, the playing field canvas was created first and the controls panel was created second, so the playing field will be to the left of the button, if we reverse the order, the playing field would be to the right.
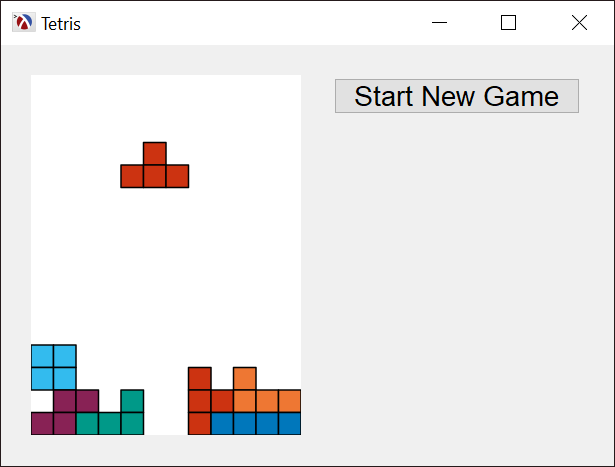
The Start New Game Button
Keeping Score
There are several possibilities for keeping score (for example higher score for multiple lines cleared), but here we’ll keep things simple: the user will get one point for each line they clear and the user interface will display the score using a message% object:
The message object needs to be created after the “Start New Game” button, for it to be placed underneath it. The message starts with an initial label, but this will be updated later. The curious “000000” string is there to ensure the control is big enough to hold any score: since a message% object will calculate its minimum size based on the initial label, if we start with the empty string, the message will not display anything when we set an actual label1.
The actual score will be kept in the current-score variable and will be updated using the function on-update-score. Since we need to keep the current score variable and the GUI display consistent, it is worth grouping those operations inside a single function. In our case, the function will only update the score if it increases — this saves some time as we can call this function as often as we want and will only update the GUI when the score changes:
on-update-score also has a force? parameter which, when set to #t, will update the score even if it is less than the current score. This is a convenience used to reset the score in the start-game function when a new game starts:
1 2 3 4 |
(define (start-game) (on-update-score 0 #:force? #t) ;; ... rest of the start game initialization unchanged ) |
To update the score, we count the full lines after the current block has been merged into the filled lines but before we remove them. This happens in spawn-new-block:
1 2 3 4 5 6 7 |
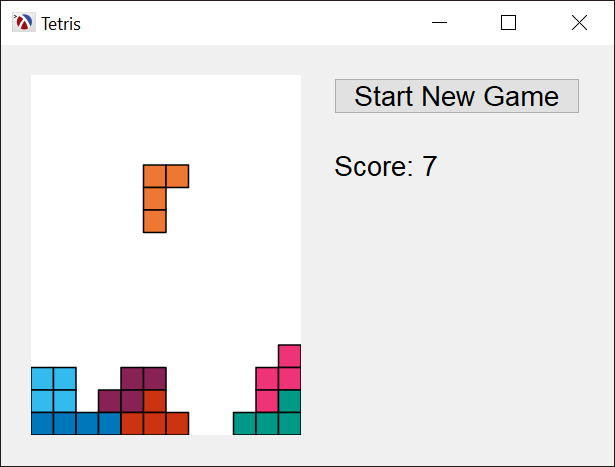
Game Score Display
Increasing Difficulty
To encourage players to use the “Start New Game” button, we need to increase the difficulty of the game as the play progresses. In Tetris, difficulty can be increased by making blocks fall faster. To keep things simple, we’ll increase the speed of the blocks every 10 completed lines. The game has no direct concept of speed, but pieces fall (move down) on a timer, which in our program “ticks” every 500 milliseconds. If we decrease this timer interval, pieces will fall faster.
We’ll call this increased difficulty, “game level” and it will be displayed in a message% under the game score:
As with the game score, we will need to keep track of the current level and update it. Since the level is always determined from the score (number of completed lines), we only need to update the on-update-score function to calculate and update the level value, display that value in the GUI and create a new timer with a faster tick rate (unfortunately timer objects cannot change their tick rate once created):
1 2 3 4 5 6 7 8 9 10 11 12 13 |
(define current-level 0) (define (on-update-score new-score #:force? (force? #f)) (when (or force? (> new-score current-score)) (set! current-score new-score) (send score set-label (format "Score: ~a" current-score)) (define new-level (exact-truncate (/ current-score 10))) (when (or force? (> new-level current-level)) (set! current-level new-level) (send level set-label (format "Level: ~a" (add1 current-level))) (send timer stop) ; stop previous timer (define new-interval (max 100 (- 500 (* 10 current-level)))) (set! timer (new timer% [notify-callback on-tetris-tick] [interval new-interval]))))) |
A few interesting things to note about keeping track of the game level: like many things with computers, the lowest level is level 0 and it is a natural calculation when the current score is less than 10. Users might not appreciate however that they are at level 0, so the code which updates the GUI will add 1 to the value of current-level, so the displayed levels are 1, 2, 3, etc.
Second, the timer value is limited to a minimum value (100 milliseconds in our case): time interval is decreased by 10 milliseconds each level, a crafty player might reach level 51, the timer interval would become negative and our program would fail with an exception. Better not risk it.
Increasing the play speed is not something that can be captured in a screen shot, so you need to try it out:
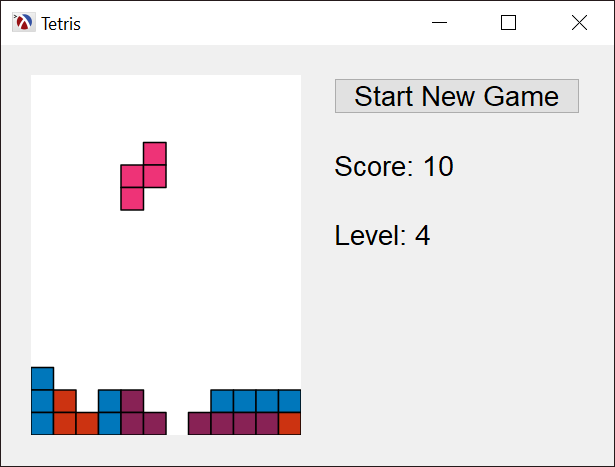
The Game Level Display
Peeking at the Next Block
To assist the player with the decision of where and how to place the current block, it might be useful to show what the next block will be. Our current program will select the next block in spawn-new-block only after the current block has fallen all the way to the bottom, but this can be easily changed: the program must track the next block and this is done in the-next-block variable, pick-new-block is a new function to select a new block from the list of available ones (this code was extracted out of spawn-new-block), spawn-new-block is updated to assign the next block to the current one and spawn a new next block, and finally, start-game is updated to set the next block to #f, so the next game does not start with the last block of the previous game.
1 2 3 4 5 6 7 8 9 10 11 12 13 14 15 16 17 18 |
(define the-next-block #f) (define (pick-new-block) (let ([candidate (random (length all-blocks))]) (list-ref all-blocks candidate))) (define (spawn-new-block) ;; ... Code to merge current block into the playing field remains unchanged (set! current-block (if the-next-block the-next-block (pick-new-block))) (set! the-next-block (pick-new-block)) (send next-block refresh) ;; ... Code to handle full playing field remains the same )) (define (start-game) (set! the-next-block #f) ;; ... Code to handle the rest of start-game initialization remains the same ) |
Notice in the code above that spawn-new-block also sends a refresh message to next-block, which is the canvas showing the next bloc. Let’s implement that next.
The next block is shown inside a group-box-panel%. This panel draws a border and places a label around its child controls and it was the easiest way to label the canvas which shows the next block — this way, the canvas only has to display the block inside it.
The next block will be displayed in a canvas%, object, but we use a one of the blocks as a sample, to make the canvas the same size as the blocks:
Finally, below is the paint method for the next block canvas, which simply draws the block picture in the middle of the canvas. Note that the function takes care to draw the block in the center of the canvas by obtaining the canvas dimensions and the pict dimensions — this would appear unnecessary, given that we created the canvas to be the same size as the pictures, but a windowing system will not always respect the requested widget dimensions, and it is best to always calculate positions and dimensions based on the current values obtained from the widget.
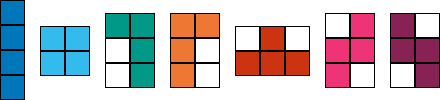
If you try the code above, you will see that, while working, the blocks are not drawn in the center of the canvas. This is because all the blocks are defined inside a 4x4 grid, but they are not centered inside this grid. Here is what the blocks look again:

The Tetris Blocks
Since we already defined a function to determine the bounding box of a block inside its 4x4 grid (the function is block-bounding-box and was defined in the previous blog post), we can use inset/clip, which is part of the pict package, to trim a Tetris block so it contains only the actual block:
1 2 3 4 5 6 7 8 9 |
(define/contract (trim-block-pict block) (-> valid-block? pict?) (define-values (min-x min-y max-x max-y) (block-bounding-box block)) (inset/clip (block->pict block) (- (* square-size min-x)) ;; left (- (* square-size min-y)) ;; top (- (* square-size (- 3 max-x))) ;; right (- (* square-size (- 3 max-y))))) ;; bottom |
Here is what the trimmed blocks look like:
The Tetris Blocks, Trimmed to Size
The next block canvas pain function, on-next-block-paint, can now use the trim-block-pict instead of block->pict, and blocks will be centered inside the canvas:
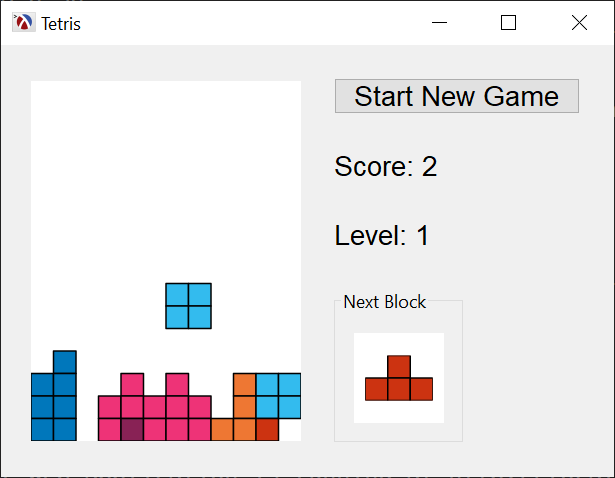
The Next Block Display
Showing Block Statistics
Perhaps I am not the only one who wondered if the blocks are actually randomly selected while waiting for an I-Block that never shows up, so, as a last improvement, we’ll display the number of times each block showed up.
To keep track of the number of times each block was spawned, we’ll use a hash table mapping the block itself to the spawn count. If you remember, the blocks are defined as a list of strings, but Racket can use these as hash keys just fine, so there is no need to come up with another block naming convention to use as hash keys. The the-block-statistics is part of the game state and needs to be reset in the start-game function:
Statistics are updated in spawn-new-block, which just increments the counter corresponding to each block and refreshes the block-statistics canvas which shows these statistics (this will be defined later).
1 2 3 4 |
(define (spawn-new-block) ;; ... Rest of the block spawning code remains the same (hash-update! the-block-statistics current-block add1 0) (send block-statistics refresh)) |
Perhaps, using the hash-update! to increment the count requires some explanation: hash-update! applies a function to the value stored in the hash table for a key (the current-block in our case) and updates the value with what the function returns. add1 is used as the update function, which simply returns its argument incremented by 1. The last parameter in the hash-update! call is the value to use when there is no value for the key in the hash table. This is convenient, because we can simply initialize our statistics to the empty hash table, and a new entry will be created the first time we try to update the statistics for each block.
The next step is to display the statistics, and, as with the rest of the drawing in this program, we’ll use the pict package. The table pict constructor builds a table out of the corresponding picts, and we can use it to construct a table with the block image and the count and percentage next to it. We also scale the block size to 80%, to try to keep the picture size a bit smaller:
1 2 3 4 5 6 7 8 9 10 11 |
(define (make-statistics-pict stats) (define total (for/sum ([value (in-hash-values stats)]) value)) (define picts (flatten (for/list ([block (in-list all-blocks)]) (define count (hash-ref stats block 0)) (define percent (* 100 (if (> total 0) (/ count total) 0))) (list (scale (trim-block-pict block) 0.80) (text (format "~a (~a %)" count (exact-round percent)) 'default 16))))) (table 2 picts lc-superimpose cc-superimpose 5 3)) |
We can test the function separately from the Tetris program, by generating some test data and running it in the DrRacket REPL:
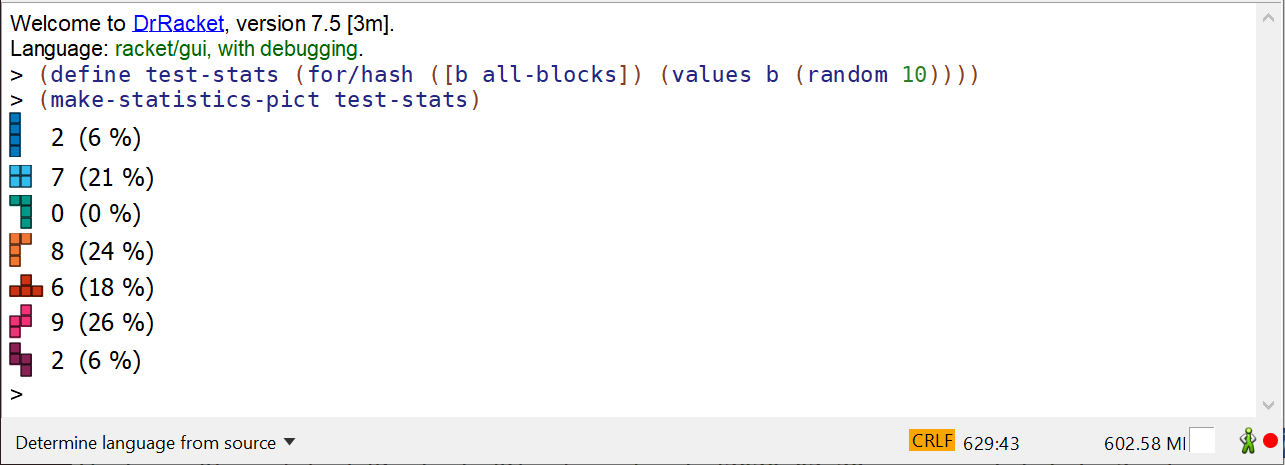
The Block Statistics Picture
The GUI changes for displaying block statistics should look familiar by now: we’ll create a group-box-panel% to surround the statistics picture and a canvas to hold the picture, similar to what we did for showing the next block. The block-statistics-panel is added to the game-panel, which means that the statistics will show up to the right of the other controls on the window:
1 2 3 4 5 6 7 8 9 10 11 12 13 14 15 16 17 18 19 20 21 22 23 24 25 26 27 |
(define block-statistics-panel (new group-box-panel% [label "Block Statistics"] [font game-font] [border 10] [parent game-panel] [stretchable-width #f] [stretchable-height #f])) (define (on-block-statistics-paint canvas dc) (send dc clear) (define pict (make-statistics-pict the-block-statistics)) (let-values ([(dc-width dc-height) (send dc get-size)]) (draw-pict pict dc (/ (- dc-width (pict-width pict)) 2) (/ (- dc-height (pict-height pict)) 2)))) (define block-statistics (let ((sample-pict (make-statistics-pict (make-hash)))) (new canvas% [parent block-statistics-panel] ;; The height of the statistics pict will not change, but the width ;; will, as the numbers grow, leave some room in the canvas! [min-width (exact-round (+ 50 (pict-width sample-pict)))] [min-height (exact-round (+ 10 (pict-height sample-pict)))] [stretchable-width #t] [stretchable-height #t] [paint-callback on-block-statistics-paint]))) |
And here is the result:
Tetris Game With Completed GUI
Final thoughts
There are a lot of things which would require additional polishing in this GUI application, for example, things don’t quite line up and resizing the window is good, but not great. Laying out the GUI controls is one area where a lot of time can be spent when writing GUI applications. The Racket GUI library supports layout control by specifying the minimum widget dimensions and whether they are allowed to stretch or not, alignment, spacing and borders for container controls, nesting container controls and even writing your own container control with its own custom rules. However, all these topics were omitted from this blog post, to keep things simple (or at least, simpler).
In this program, there is also lot of game state kept around (current block, block position, next block, filled lines, score, level, etc), which are all global variables and start-game is really a state initialization function. For a blog post, I decided to do this, since this is the simplest design which allows incremental code updates. As an application grows in complexity, it is a good idea to be more disciplined the global state and perhaps group it in a structure or object.
Finally, there are several variations on the Tetris game, and this blog post is not really about implementing them all, however, if you like a particular Tetris feature that is missing, why not try to add it yourself?
The full code for the program presented in this blog post is available in this GitHub Gist
-
…
reflow-containerandstretchable-widthare beyond the scope of this blog post ↩