Asteroids (Game Engine)
… in which we look how we can implement the classic Asteroids game game using only the Racket language and its graphics facilities. We’ll implement a basic game engine, a basic physics engine and the game itself, and manage to do it in about 1000 lines of code.
If you are not familiar with the game, the premise is that the player controls a space ship and needs to shoot and destroy asteroids, while avoiding collision with them. The game is more challenging to implement than other games we looked at, since it involves moving bodies and bouncing them off each other, which requires simulating a physics model. Still, it can all be implemented in plain Racket, without the use of any external libraries.
The Game Engine
You don’t need a Game Engine to implement a game, but it helps. A game engine allows abstracting away some of the peculiarities of the user interface (GUI) and allows designing the game as a collection of actors which know how to move, paint themselves on the screen and interact with each other.
Scene and Actors
The game engine manages a scene which is a collection of actors. In complex games, managing a scene is a complex topic in itself, but here we can simply use a list as the scene:
1 |
(define the-scene '()) |
Our scene starts empty, but it would be useful to have some functions to add and remove actors from the scene. These are simply operations which add and remove elements from the list:
What can be done with this scene? Well, we need a way to update the scene as the time passes, a way to show the scene in a GUI window, and tell the scene of any user input, so the user can control some of the actors in the game, such as the ship. Here are the functions which do each of these things, and in our simple game engine, each of these operations means going over the actors in the scene and invoking a method on the actor itself:
1 2 3 4 5 6 7 8 9 10 11 |
(define (paint-scene scene canvas dc) (for ([actor (in-list scene)]) (send actor paint canvas dc))) (define (update-scene scene delta-time) (for ([actor (in-list scene)]) (send actor update/delta-time delta-time))) (define (handle-keyboard-event scene event) (for ([actor (in-list scene)]) (send actor keyboard-event event))) |
Now, that we have some operations on the scene itself, we have a better understanding of what each actors needs to provide to work with the game engine:
- a
paintmethod, which paints the actor onto the canvas - an
update/delta-timemethod, which updates the internal state of the actor (e.g. moving it to a new position, according to its velocity) - a
keyboard-eventmethod, which informs the actor that the user pressed the key. This allows the actor to take some action on user input — for example, the ship will move and turn in response to user input.
Since we know what methods the actors must provide, we can encode this information in an interface, this way we can use the racket contract system to check that our actors implement the correct set of methods, and report an error if they don’t:
Not all actors will need to implement all these methods. For example, only the ship actor is interested in keyboard input, since the user can only control the ship, yet all actors must implement the keyboard-event method. To simplify things, we can define a “root” class for all our actors which provides default implementation for all these methods:
1 2 3 4 5 6 7 |
(define actor% (class* object% (actor<%>) (init) (super-new) (define/public (paint _canvas _dc) (void)) (define/public (update/delta-time _dt) (void)) (define/public (keyboard-event _e) (void)))) |
By deriving from the actor% class, other actors will only need to override the methods that they actually need, yet still be able to correctly interface with the game engine.
Side Notes
-
The
actor<%>interface andactor%base class only provide a sufficient interface to implement our game, and a more generic game engine would need to provide additional method. For an alternative implementation of the actor interface, see the space invaders blog post. -
Keeping the scene a simple list works remarkably well in Racket, it can manage scenes of 150 – 200 actors without a drop in performance, however, it is inefficient. In particular, only one actor in the scene is interested in keyboard events, yet all of them will receive them. An alternative implementation would be for the game engine to keep separate lists for what types of events each actor wants to receive and allowing actors to register for these events.
Frame and Canvas
The game engine needs to present the game window to the user and this involves implementing the user interface. We’ll start with the game window:
1 2 3 4 5 6 7 8 9 10 11 12 13 |
(define game-outcome 'not-started) (define game-window% (class frame% (init) (super-new) (define/override (on-subwindow-char receiver event) (handle-keyboard-event the-scene event) (super on-subwindow-char receiver event)) (define/augride (on-close) (set! game-outcome 'abandoned)))) (define the-frame (new game-window% [label "Asteroids"] [width 800] [height 450])) |
The game window will not only hold the view of the game but also receive various events from the system. Here we are interested in two of them: keyboard events are passed on to the actors in the scene by calling handle-keyboard-event and, when the window is closed, we inform the game loop that the game was abandoned by setting the global value game-outcome to 'abandoned.
Finally, we create an instance of the game-window% class, which we call the-frame — this will be the actual game window. Simply creating a window will not show it on the screen, for that to happen, we need to call the show method, but before we do that we have some more work to do.
The canvas object is what allows us to actually draw on the window, so we need to create one as a child of the-frame:
While it may seem counterintuitive, GUI systems (not just Racket), do not allow the application to draw something on the screen at any time it wants to — instead the application must provide a callback function, which is called by the canvas when it is ready to pain the window. In our case, the paint callback is called on-canvas-paint and it is supplied to the canvas object as the paint-callback field. Here is the implementation:
The callback simply sets the smoothing type for the canvas and sets an initial transparent brush (meaning that objects in the scene will not be filled in with any color), than calls paint-scene which allows each actor to paint itself onto the canvas.
Game Loop
The last piece of the game engine is the game loop itself. This is the function which effectively runs the game. The game loop has a few tasks to do:
- Switches garbage collection mode to
'incrementalthis will use fewer pauses during garbage collection, making the game run smoother - Shows the frame and transfers focus to it, so the game receives keyboard events.
- Finally it goes into a loop of repeatedly calling
update-sceneand telling the canvas to redraw itself, which will ultimately invoke the paint callback and callpaint-scene. This continues until thegame-outcomevariable is set to'abandonedwhich happens when the user closes the window.
1 2 3 4 5 6 7 8 9 10 11 12 13 14 15 16 17 18 19 20 |
(define (run-game-loop #:frame-rate [frame-rate 60]) (collect-garbage 'incremental) (set! game-outcome 'in-progress) (set! game-score 0) (send the-frame show #t) (send the-frame focus) (define frame-time (* (/ 1.0 frame-rate) 1000.0)) (let loop ([last-game-time (current-inexact-milliseconds)] [current-game-time (current-inexact-milliseconds)]) (define dt (- current-game-time last-game-time)) (update-scene the-scene the-collision-handlers dt) (send the-canvas refresh-now) (define update-duration (- (current-inexact-milliseconds) current-game-time)) (define remaining-time (- frame-time update-duration)) (sleep/yield (/ (max 0 remaining-time) 1000.0)) (unless (equal? game-outcome 'abandoned) ;; NOTE: current-game-time becomes last-game-time next iteration (loop current-game-time (current-inexact-milliseconds))))) |
A game is a real-time program, which means that the program must run at a certain speed, not faster, and preferably not slower. The game loop keeps track of the time it takes to run all the functions in the game and calculates the remaining time such that each loop iteration happens in the same amount of time (this is the game’s frame rate). It than waits the remaining time using sleep/yield, so that the next loop iteration starts just in time.
The Physics Engine
Another component in a game is the Physics Engine — this is responsible for simulating, to various degrees of accuracy, the physical movement of the objects in the game. A physics engine is independent from the Game Engine — one can swap one physics engine for another, although the two must work closely together.
Simulating accurate real-world physics is a complex topic, but here we’ll keep things simple at the expense of accuracy — our physics engine will be capable of moving objects according to their speed and acceleration as well as handling collisions between them, however it will not fully simulate real world interactions between asteroids in outer space. Still, it will be credible enough for a simple game.
Bodies
Our physics engine will deal with a single kind of object: the rigid body. “Body” is simply another term for object, and we’ll use it when referring to objects managed by the physics engine. The term “Rigid” refers to the fact that the bodies managed by the physics engine will not change shape, that is, they cannot bend or dent.
Our physics engine is responsible for keeping track of the position, speed and acceleration of a body. We also allow bodies to rotate or spin, so we also need to track orientation and angular velocity.
Since we must also check for collisions, we need to keep track of the shape and size of each body — doing this for bodies of arbitrary shape is complex, so we will assume that all the bodies are circles. This means that, even though asteroids in the game will have an irregular shape, as far as their interaction are concerned, they will behave like balls. Since all physics bodies are circles, their shape is controlled by a single value: the radius.
We can represent bodies as structures, with a slot for each of the properties discussed so far.
1 2 3 4 5 6 7 8 9 |
(struct body (position velocity acceleration radius orientation ; orientation for spinning bodies angular-velocity velocity-damping) #:transparent) |
There is an additional structure slot defined above, the velocity-damping — this will be used to simulate friction for the space ship: normally, in space, once a ship is accelerated, it will continue to maintain its speed, and to slow down a ship, the user would have to spin it 180 degrees and accelerate it in the opposite direction. Since this is too complex for the user, we will introduce friction, so, once acceleration is removed, the body will eventually slow down. A velocity-damping of 1 will mean there is no damping and the body will continue to maintain its current speed indefinitely.
Vectors
The radius, orientation, angular-velocity and velocity-damping properties are simple numbers. For example a body might have a radius of 30, an orientation of pi/2 radians and an angular velocity of 0.05 radians/second. But what exactly is the position, velocity and acceleration? This is a two-dimensional game, so they cannot be simple numbers. We could represent positions as 2D coordinates, but the speed needs to encode both how fast an object is moving and in what direction it is going.
There is an elegant solution for this problem: vectors. For 2D space, these are structures containing 2 values, along with some mathematical operations that can manipulate these values. A vector can encode a position, but also a direction and a magnitude, and allow us to apply the same math formulas for speed and acceleration from 1D space to 2D space.
We’ll represent vectors as a structure, called v2 (2 because these are two dimensional vectors), and, since some vectors, such as the left an right directions, are used often, we also define them as global values:
1 2 3 4 5 6 7 |
(struct v2 (x y) #:transparent) ; a vector is a 2D item having an x and y component (define vzero (v2 0 0)) ; a convenient "zero vector" (define vright (v2 1 0)) ; the right unit vector -- a vector pointing to the right (define vleft (v2 -1 0)) ; the left unit vector (define vup (v2 0 -1)) ; the up unit vector (define vdown (v2 0 1)) ; the down unit vector |
We need to define some operations on the 2D vectors: vplus, vminus and vnegate are analogous to the +, - and unary minus (negation) operations on numbers. There are some operations which are specific to vectors:
vlengthcalculates the length of the vector,vnormdetermines the vector of length 1 which has the same direction as the given vector (effectively extracting the direction from the vector)vscalechanges the length of the vector,vrotaterotates the vector counterclockwise by an anglevdotcalculates the dot product of two vectors — this is a surprisingly useful operation, if you are not familiar with it, check the linked Wikipedia article on the topic.vreflectcalculates the “reflection” vector around a normal — this can be used to determine which way a body will bounce if it hits a surface at an angle.
The implementation of these operations is fairly simple, but you are not familiar with vectors and their operations, you might want to use your favorite search engine to find some good introductions to them.
1 2 3 4 5 6 7 8 9 10 11 12 13 14 15 16 17 18 19 20 21 22 23 24 |
(define (vplus a b) ; vector addition (v2 (+ (v2-x a) (v2-x b)) (+ (v2-y a) (v2-y b)))) (define (vminus a b) ; vector subtraction (v2 (- (v2-x a) (v2-x b)) (- (v2-y a) (v2-y b)))) (define (vnegate a) ; vector negation, i.e. (- v) (v2 (- (v2-x a)) (- (v2-y a)))) (define (vscale v s) ; scaling a vector by a number (Scalar) (v2 (* (v2-x v) s) (* (v2-y v) s))) (define (vdot a b) ; dot product (the magic operation) (+ (* (v2-x a) (v2-x b)) (* (v2-y a) (v2-y b)))) (define (vlength v) ; the length of a vector (match-define (v2 x y) v) (sqrt (+ (* x x) (* y y)))) (define (vnorm v) ; normalize: make a unit vector with the same direction as v (define l (vlength v)) (v2 (/ (v2-x v) l) (/ (v2-y v) l))) (define (vreflect v n) ; reflect a vector around a normal 'n' (vminus (vscale n (* 2 (vdot v n))) v)) (define (vrotate v theta) ; rotate counter clockwise theta radians (define cos-theta (cos theta)) (define sin-theta (sin theta)) (match-define (v2 x y) v) (v2 (- (* cos-theta x) (* (- sin-theta) y)) (+ (* sin-theta x) (* cos-theta y)))) |
Movement
Finally, we need a function to update a physics body as time passes: the function will receive a body structure and a “delta time”, dt, which is the time passes since the last update, and will return a new body with an updated position, velocity and orientation, as follows:
- the
velocityis updated by applying the velocity increase, as defined by multiplying theaccelerationanddt. Also the velocity damping is applied at this stage. - the
positionis updated by applying the movement, which is thevelocitymultiplied by the delta time,dt. - the
orientationis updated by applying the amount of movement obtained by multiplyingangular-velocityby the delta timedt
The update-body function is shown below, and there are two important things to note: (1), since the position, velocity and acceleration are vectors, the updates will automatically include the direction in which the objects move and (2) if we use zero values for the velocity and acceleration, the body will remain stationary, also a zero angular-velocity value means that the body does not rotate.
1 2 3 4 5 6 7 8 9 10 11 12 13 |
(define (update-body b dt) (match-define (body position velocity acceleration radius orientation angular-velocity velocity-damping) b) (define new-velocity (vscale (vplus velocity (vscale acceleration dt)) velocity-damping)) (define new-position (vplus position (vscale new-velocity dt))) (define new-orientation (+ orientation (* angular-velocity dt))) (body ; create and return an updated body new-position new-velocity acceleration ; unchanged radius ; unchanged new-orientation angular-velocity ; unchanged velocity-damping)) ; unchanged |
The Physics Engine will also be responsible for handling collisions between bodies, but we already wrote a lot of code with little to show, so we’ll switch now to writing our fist asteroid actor.
The Asteroids
There is now enough functionality in the Game and Physics Engines to start building the first actor of the game: the asteroid. The asteroid will be a class derived from actor% and will have a way to update itself, so it moves around, and can paint itself on the screen. Before we can show the full implementation, we need to discuss how exactly we will draw the asteroid.
Models
All visible elements in our game will be made up from lines which connect a set of points, so each asteroid will be represented as a list of points. The simplest way to design them is to use a square ruled paper notebook to draw some circles and than outline some lines with an irregular shape. These lines must still follow the circle, as all our physics bodies will be circles, so they cannot deviate too much from that shape. Here are some examples, where I drew four asteroid models and the space ship:

The points along the circle will be scaled up to various sizes when being drawn, so we can have different sizes for the asteroids, but the initial set of points will be stored with the unit circle, that is, the radius is 1. Having the initial models use a unit circle allows us to easily calculate the size, since the scale factor is the only one that contributes to the size of the model.
In the picture above, the circles use 5 squares for the radius, so all coordinates are divided by 5, producing the following result:
1 2 3 4 5 6 7 8 9 10 11 12 13 14 15 16 17 |
(define asteroid-path-1 (points->dc-path '((0/5 5/5) (3/5 4/5) (4/5 3/5) (3/5 1/5) (5/5 0/5) (4/5 -4/5) (1/5 -5/5) (-2/5 -4/5) (-4/5 -4/5) (-5/5 -1/5) (-3/5 -1/5) (-5/5 2/5) (-3/5 3/5) (-2/5 5/5) (0/5 5/5)))) (define asteroid-path-2 (points->dc-path '((0 -6/5) (-2/5 -4/5) (-4/5 -4/5) (-5/5 -1/5) (-4/5 2/5) (-4/5 3/5) (-3/5 3/5) (-1/5 5/5) (4/5 3/5) (4/5 1/5) (5/5 0) (4/5 -3/5) (2/5 -4/5) (0 -6/5)))) (define asteroid-path-3 (points->dc-path '((1/5 -4/5) (-2/5 -5/5) (-2/5 -3/5) (-4/5 -4/5) (-4/5 -2/5) (-5/5 0/5) (-5/5 3/5) (-3/5 4/5) (-2/5 3/5) (0/5 5/5) (4/5 3/5) (3/5 2/5) (3/5 1/5) (5/5 1/5) (4/5 -3/5) (3/5 -5/5) (1/5 -4/5)))) (define asteroid-path-4 (points->dc-path '((0/5 -5/5) (-2/5 -4/5) (-4/5 -4/5) (-4/5 -1/5) (-5/5 1/5) (-3/5 4/5) (-1/5 5/5) (2/5 5/5) (1/5 3/5) (3/5 4/5) (5/5 1/5) (3/5 -2/5) (3/5 -4/5) (0/5 -5/5)))) |
We could have drawn these lines using draw-line calls on the device context of the canvas, but a more efficient way to do it is to construct a dc-path% object — this is an object which encapsulates several drawing commands into one, making it simpler to draw complex shapes. The points->dc-path function constructs such a path from our points:
We now have bodies, representing the physical locations of our objects as well as models, representing their visual look, so we can write a function to draw the models, which is shown below. There are two important points about this function:
- the
model, which is adc-path%is always drawn at scale 1 around the origin (0, 0). To make the object bigger and position it on the screen, the device contextdcitself is scaled, rotated and translated. - the device context
dcis a shared resource and any setting, such as the pen, will remain in effect until changed. It is a good habit for every draw function to save the old parameters, change them and restore old draw parameters before the function returns — this only needs to be done for the draw parameters that are actually changed.
1 2 3 4 5 6 7 8 9 10 11 12 13 14 15 16 17 18 |
(define (draw-model dc model pen body) ;; Save parametes we are about to change (define old-transformation (send dc get-transformation)) (define old-pen (send dc get-pen)) (define position (body-position body)) (define scale (body-radius body)) (define orientation (body-orientation body)) (send dc set-origin (v2-x position) (v2-y position)) (send dc set-scale scale scale) (send dc set-rotation (- orientation)) (send dc set-pen pen) (send dc draw-path model) ;; restore old parameters (send dc set-pen old-pen) (send dc set-transformation old-transformation)) |
The Actor
With all this preparation, we are now ready to write our first actor, the asteroid. Apart from the initialization arguments, which are used to create the physics body, the class selects a model from the list of available asteroids, selects a size between 60 and 90 and creates the physics body. The update/delta-time simply calls update-body from the physics engine, while the paint method calls draw-model.
1 2 3 4 5 6 7 8 9 10 11 12 13 14 15 16 17 18 19 20 21 22 23 24 25 26 27 28 29 30 31 32 33 34 35 |
(define asteroid-paths (list asteroid-path-1 asteroid-path-2 asteroid-path-3 asteroid-path-4)) (define asteroid% (class actor% (init-field [initial-position #f] [initial-direction (random-direction)] [initial-speed (random-around 0.05)] [initial-angular-velocity (random-around 0.0005)] [model (random-ref asteroid-paths)] [size (random 60 90)]) (super-new) (unless initial-position (error "asteroid%: initial position must be specified")) (define the-body (body initial-position (vscale initial-direction initial-speed) vzero ; no acceleration size ; radius 0 ; orientation initial-angular-velocity 1.0 ; no velocity damping )) (define/override (update/delta-time dt) (set! the-body (update-body the-body dt))) (define pen (make-scaled-pen "firebrick" 3 size)) (define/override (paint _canvas dc) (draw-model dc model pen the-body)))) |
The above definition also makes use of two helper functions, random-direction, which creates a unit vector pointing in a random direction and random-around which generates a random number around a specified value.
1 2 3 4 5 6 7 8 9 |
(define (random-direction) ; construct a vector pointing into a random direction (define max 10000) (define (rnd) (/ (- (random 1 (add1 max)) (/ max 2)) (/ max 2))) (vnorm (v2 (rnd) (rnd)))) (define (random-around value #:precision (precision 1e4) #:nudge (nudge 1e-1)) (define n (* value nudge)) (define half-precision (exact-truncate (/ precision 2))) (+ value (* n (/ (random (- half-precision) half-precision) precision)))) |
The last helper function, make-scaled-pen is more subtle: when the device context is scaled up for drawing, it scales up everything, including the width of the lines, so, a pen of width 1 will show up as a line of width 30 if the device context is scaled up by 30. The make-scaled-pen creates pens whose width is scaled down so they show up correctly on such device contexts:
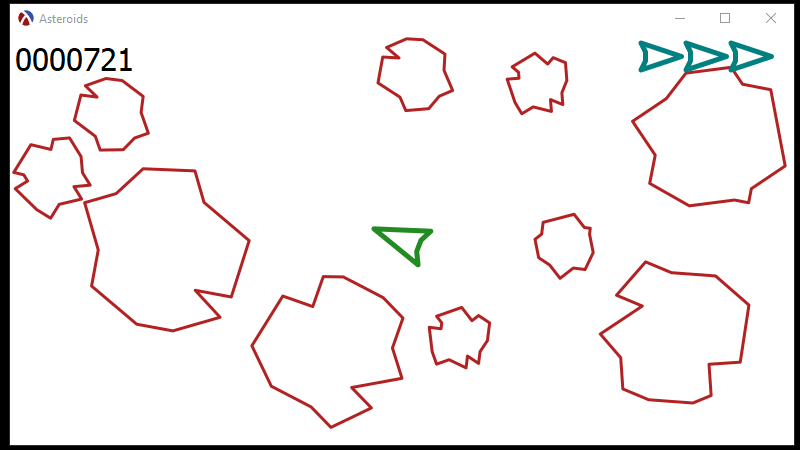
A Demo
We can create a simple scene with three asteroids in, to show how it all works. For the first example, we’ll set the initial direction to zero, so the asteroids will not move. The asteroid% class is also set up to pick a random asteroid model and a random angular velocity:
Here is what happens if we assign an initial speed and direction to the asteroids:
1 2 3 4 5 6 7 8 9 10 11 12 13 |
(add-actor (new asteroid% [initial-position (v2 150 200)] [initial-direction (random-direction)] [initial-speed 0.04])) (add-actor (new asteroid% [initial-position (v2 350 200)] [initial-direction (random-direction)] [initial-speed 0.04])) (add-actor (new asteroid% [initial-position (v2 550 200)] [initial-direction (random-direction)] [initial-speed 0.04])) (run-game-loop) |
The asteroids now start moving, but with nothing to stop them, they just drift off the screen and never return. We need a mechanism to keep the asteroids inside the playing field, perhaps having them bounce off some invisible walls and to do that, we need to update the physics engine to handle collisions.
By the way, here is the program we have so far.
The Physics Engine Again
The game requires objects to collide with each other and this is also the responsibility of the physics engine. From a high level point of view, the physics engine will need to check if every pair of actors in the scene collide with each other, but keep the actual handling separate, since actual handling collisions depends on the actual actors (collisions between an asteroid and another is handled differently than collision between an asteroid and the space ship).
Collision Handling Mechanism
The handle-collisions function is the toplevel entry into the collision handling, it receives the scene, which is a list of actors, as well as a list of collision handlers and traverses the scene, calling handle-collisions-between for every pair of actors. The function is careful not to check for collisions between an actor and itself, as well as not to handle collisions twice, since the collision between actors A and B is the same as the collision between the actors B and A:
1 2 3 4 5 6 7 8 9 10 11 12 13 |
(define (handle-collisions scene collision-handlers) (let outer-loop ([scene scene]) (unless (null? scene) (define first-actor (first scene)) ;; Only check for collisions between FIRST-ACTOR and the remaining ;; actors -- this ensures that we only call collision handling once for ;; each pair. (let inner-loop ([remaining-actors (rest scene)]) (unless (null? remaining-actors) (define second-actor (first remaining-actors)) (handle-collisions-between first-actor second-actor collision-handlers) (inner-loop (rest remaining-actors)))) (outer-loop (rest scene))))) |
The update-scene function will need to be updated to also handle collisions before calling update/delta-time on each actor:
The handle-collisions-between is responsible for finding a collision handler for a pair of objects. The collision-handlers is a list where we have associate a handler function for each type of actors in the scene, so it just traverses that list, finding a handler function to invoke:
1 2 3 4 5 6 7 8 9 10 11 12 13 |
(define (handle-collisions-between first-actor second-actor collision-handlers) (for/or ([handler (in-list collision-handlers)]) (match-define (list first-object second-object handler-function) handler) (cond ((and (is-a? first-actor first-object) (is-a? second-actor second-object)) (handler-function first-actor second-actor) #t) ((and (is-a? first-actor second-object) (is-a? second-actor first-object)) (handler-function second-actor first-actor) #t) (else #f)))) |
Finally, we maintain a global list of collision handlers and a function to add a new handler. This global list is what is passed to update-scene by the game loop.
So far, we have just added a mechanism which allows invoking a handler function for every pair of actors in the scene, we now need to implement our first collision handler.
Walls
One way to keep asteroids inside the playing field is to introduce some invisible walls that they can collide with. The walls will be invisible (so they will have no paint method) and will also not move (so they don’t have an update/delta-time method). In fact a wall is simply a line defined by a normal vector (which is the direction perpendicular to the line) and a distance from the origin.
1 2 3 4 5 6 7 |
(define wall% (class actor% (init-field normal distance) (super-new) (define/public (get-normal) normal) (define/public (get-distance) distance))) |
The “normal” + “distance” way of representing lines makes it easy to determine how close a point is to a line, so, the body-wall-collision? function can simply calculate the distance from the centre of the body to the line and check if it is less than the body radius to determine if the body collides with the line:
We can now define an “asteroid - wall” collision handler which checks if an asteroid is colliding with a wall, than tell the asteroid to reflect by the wall’s normal:
The asteroid class will need to be updated to provide a get-body and a reflect-by-normal methods:
1 2 3 4 5 6 7 8 9 10 11 12 13 |
(define asteroid% (class actor% (init-field ...) (super-new) (define the-body ...) (define/public (get-body) the-body) (define/public (reflect-by-normal normal) (set! the-body (bounce-body the-body normal))) ;; Rest of the asteroid class unchanged )) |
Finally, bounce-body will change a body’s direction of travel (velocity) by reflecting it off a normal. To make things a bit more interesting, the function also perturbs the reflection by the body’s angular velocity — this is not realistic physics, but makes the game more interesting:
Bouncing off walls
With these changes, we can add some walls to the scene and have the asteroids bounce off them. It would be more realistic to add the walls outside the scene, so the asteroids move off the screen before bounding back, but this simple example makes them more visible and making that change would mean simply adjusting the distance parameter for the wall:
1 2 3 4 5 6 |
(send the-frame reflow-container) (define-values (canvas-width canvas-height) (send the-canvas get-size)) (add-actor (new wall% [normal vright] [distance 0])) (add-actor (new wall% [normal vleft] [distance canvas-width])) (add-actor (new wall% [normal vdown] [distance 0])) (add-actor (new wall% [normal vup] [distance canvas-height])) |
Bouncing off other asteroids
We can easily extend collision handling to handle collision between the asteroids themselves. First, we’ll need a function to determine if two bodies collide, this means simply calculating the distance between the positions of the two bodies and comparing it against the sum of their radii:
The function to handle collisions between asteroids will simply bounce off both asteroids by calling reflect-by-normal:
1 2 3 4 5 6 7 8 9 10 |
(define (handle-asteroid-asteroid-collision a b) (define a-body (send a get-body)) (define b-body (send b get-body)) (when (bodies-collide? a-body b-body) (define collision-direction (vnorm (vminus (body-position a-body) (body-position b-body)))) (send a reflect-by-normal collision-direction) (send b reflect-by-normal (vscale collision-direction -1)))) (add-collision-handler asteroid% asteroid% handle-asteroid-asteroid-collision) |
This is all that is needed to make the asteroids collide. The updated version of the code so far is available in this GitHub Gist.
Final Thoughts
We have spend most of this blog post designing a simple game engine and a physics engine to go with it and, while we have not completed the game yet, the last sections showed how easy it is to add game functionality once the framework is in place. In the next part we’ll focus on building the actual actors for the game to make it playable.